≡ Menu

Short on Time? Learn How To Make Friends With Time

Will you have enough time to accomplish all your career goals? Will you have time for interest for things outside of career? These were questions that I pondered in my earlier years.

Could I share with you how I found my answers to these questions?

My ideas of career were shaped by the Victorian mentality which were still pervasive in my youth. You worked hard, stayed at the same job and when you retired you got a gold watch and that was it.

The first inkling I had that this was not so was as an employer. I was always having to hire personnel to work in my office. I found that forever was about five years and a long time was about three years. Some only lasted weeks or months.

Transcending Time and Becoming More Productive

In 1975 I had an eye-opening experience. I learned the TM technique. I was dubious about the time commitment it required. I was a very busy practicing medical specialist and I was already too busy. Where would I ever find twenty minutes twice a day to sit quietly and meditate? Yet I was so curious about the benefits that I decided to try it, if only for a few days.

Six months later, as I began to use my intelligence more creatively, I made some changes in my work schedule and immediately started doing 20% more work each day in less time that it had taken formerly. That means that every day I made 20% more income in less time.

Enough Time for Hobbies

That increase in creativity took another direction as well. I had always liked to carve on wood with a pocket knife but had never done anything significant other that win a model airplane contest. I found my interest and my skills beginning to explode in the area of woodworking. Several years later I found myself making 18th century museum reproductions without any apprenticeship or study other than what was available in books.

I can’t tell you how much satisfaction my interest outside of my career brought me. After using my deductive and analytic powers all day, it was pure bliss to let the creative aspect of my nature loose in the wood shop in the evenings.

Looking back at all this from my current perspective I realize that what hems us in is boundaries. I am busy with my career, I have no time for outside interests. This is a boundary. I have to stay in the same career until I retire or die. This is a boundary. Well, if we create boundaries, we can uncreate them. I have learned that at our center we are unbounded. We represent all possibilities. That is how some can accomplish so much.

Letting Go of Boundaries

As I began to let go of boundaries, I found a wonderful field of health care that I had overlooked. It used natural means to recreate balance in the body and mind and was not only effective but free of harmful side effects. So I embarked on a second career in my chosen field of health care.

The more I learned about this the more I wanted to share it with others. I always had a fondness for learning and the academic life so at age 47 I left the private practice of medicine and became a university professor, researcher and director of an alternative medicine clinic for the faculty and staff. Several years later I became a teacher of the TM technique and started on another teaching career.

Eventually I left the university to teach in the field and then was asked to start an alternative medical school. As I approached retirement age I decided to return to my native city and just teach the TM technique and do my woodworking. After a year of this I decided to turn my passionate hobby of woodworking into a small business. Now whenever I am not busy with one thing I love doing I am doing the other.

Your True Nature is Free of Boundaries

My point with all of this is that there is great value to getting to know the unbounded nature of the inner self. Without the technique for quieting the mind, I was completely unaware of my inner nature. Had you told me at age 26, the year I finished my academic training, that I would have so many careers and do so many different things, I would have laughed at you.

So, if you feel that you don’t have enough time for what you want to do, if you feel trapped in a career path that is no longer in your best interest, then I suggest you get a technique for becoming unbounded. TM is that technique which worked for me. The important thing is that you find one that works for you. Otherwise you will be absolutely correct. You will not escape from your self-created boundaries and time will run out.

{ 2 comments }

Woodturning Finishing and Buffing Secrets

An acquaintance of mine, Jim Oliver, at my Baltimore Area Turners wood turning club mentioned one evening at our show-and-tell that he liked the kind of finish he got with the Beal Buffing system. He passed around a bowl with a very lovely finish like I had not been able to achieve in my wood working products.

I have been seeing ads for this buffing system in woodworking catalogs but never paid too much attention. I tend to be simplistic and a slow learner. An old rag, some paste wax and elbow grease seemed much simpler to use and easier to store than three buffs, a motor and several grades of abrasives plus wax.

However I must admit that birthdays are beginning to catch up with me. My output in the shop is on the rise but my shoulders are beginning to feel the years of hand rubbing and it is not as easy as it once was. I find that as you get older you need to work smarter rather than work harder. So I decided to take a flyer.

I Splurged and Got the Beal Buffing System

My brother-in-law and his family gave me a gift certificate to my favorite local Woodcraft Store and I blew that whole thing on a Beal Buffing System. I got three buffing wheels, a two inch and a four inch set of bowl buffs, some tripoli and white diamond abrasives and a stick of carnauba wax.

I purchased a threaded aluminum piece for the bowl buffs to screw into and then be attached to the drive shaft of an electric motor. If you are like me, you probably have several old motors sitting around your shop and if not, don’t discard ones that come your way. They have lots of uses and the old motors were really built to last.

I found that I used the bowl buffs the most because of the ease of set up and changing buffs. Just unscrew one buff and screw in the next. They are color coded to match the abrasive or wax used on that buff.

woodturning buffers

You need a separate buff for each grade of abrasive and one for the wax. You never use the same buff for different abrasives or wax. In the picture below you see the tripoli bar and the bottom, the white diamond bar in the middle and the hard carnauba wax at the top.

abrasives and wax - shown as the three bars in the middle of the photo

I had some concerns that the dark looking stick of tripoli would discolor the wood. I was used to using this on metal and it made the wheel very black. I guess the black came from metal oxides because I had no problem with discoloration even on this light colored pear hollow turning I show here.

pear wood hollow form bowl with no discoloration from the buffing

My Old System of Finishing

To back up a bit, I have experimented with a number of wood finishing techniques and have finally settled on what works for me. I use tung oil. It is a drying oil, as opposed to oils that don’t dry, like corn oil or mineral oil. It is the product of a seed and is completely food safe.

That means that I don’t have to worry about toxicity to me as the finisher or to the user of the finished product. I get a completely natural form of tung oil from the Klingspor people. I may dilute it just a bit with mineral spirits for better penetration. However, when I use it on porous woods the finish is rather dull.

The other problem with the penetrating oils like tung oil or linseed oil products like Watco Danish Oil is that end grain sucks up the oil like a sponge. You can see it happen. You coat the wood generously and in a few minutes the end grain looks dry like it had not been oiled.

In turned work, you always have face grain and end grain both to deal with. If I waited a few days and then waxed the vessel it would look great at first. Yet, after a few days the area of the end grain would look dull and dingy. I might repeat waxing several times over several months until this stopped.

I realized when I did this, that the oil on the face grain had polymerized but the large quantity of the oil deep in the end grain was much slower to polymerize and it would ooze out and mar the waxed finish. Heat would accentuate this process.

I made a bowl for someone who had given me the wood. She put it in her lap while we talked. When she looked down at the bowl after some time she noted that there were beads of oil where the warmth of her legs had caused it to expand and flow out to the surface.

There Has Got To Be A Better Way

I read somewhere that if you use a de-waxed shellac that it is compatible with any kind of finish over the top of it. I had always followed the old rule of never mixing different finishing products. Now shellac has been used as a sanding sealer for ages and ages. So I got some Zinsser Bull’s Eye shellac which is guaranteed to be wax free. It was in an aerosol can and very easy to use.

After going through the sanding steps and ending with 400 grit paper I would spray the surface with the shellac and allow it to dry. Then I would sand the surface smooth again with 320 grit paper and end with 400 grit paper. At this point the grain had been pretty well sealed and the surface shellac removed. Then I would rub on the tung oil. This finish looked pretty good to my eye and it would dry in just a few days and the tung oil would not bleed through to the waxed surface. Sealing with shellac prevented the end grain from sucking up the oil finish.

Using the Beal Buffing System

After letting the oil dry for several days I then used my Beal Buffing System. You coat the buff or wheel with tripoli. Each bowl buff is color coded so you won’t use the wrong abrasive. Even buffing with tripoli begins to bring out some of the luster.

Next you change buffs and use the white diamond abrasive. It is much harder and finer than the tripoli. It removes any of the tripoli that may have adhered and shines the wood a bit more. Finally you change buffs to the one for use with carnauba wax. The bar of wax that is provided is hard as a rock and if it were to slip and fall it might shatter. When you shove it against the rotating buff only a very small amount of wax comes off as compared to the relatively soft tripoli. Yet it does not take much of the wax.

The great value of carnauba wax is that it is so hard that it won’t melt with the warmth of your fingerprint. You may have had the experience of handing someone a well waxed and shiny bowl only to get it back after being lovingly handled looking dull and dingy. This is the warmth of the hand melting the softer waxes. Carnauba won’t melt at that temperature and so remains shiny after many hands have touched the waxed surface. That is the good part. The bad part is that it is very hard to buff by hand.

In my youth there was a car polish called Simonize. It contained carnauba wax. I made the mistake of applying it generously to our 1950 black Ford. Even my young muscles could not rub it out. However it was a very durable wax job, and I can remember how the water would bead up on the surface for months when it was used. Most people took their cars to the garage to have a mechanic use a power buffer to buff out the wax.

Judge the Difference For Yourself

So, if you want to enjoy the high gloss and protective qualities of a carnauba wax job you have got to resort to power buffing. Now I make a lot of clasps for knitted shawls and scarves as shown below. When I tried my new system of using sanding sealer and buffing using the Beal Buffing System I was amazed at the difference in the appearance. The surface just seemed more alive. It was almost jewel-like.

you can see how much richer the wood looks in this picture.

Notice how much less lively the surfaces of the pins are in the picture below. These pins had not had sanding sealer but had been oiled and waxed carefully. There is just no comparison in the finish even though the woods are just as attractive in the grain and color patterns. They just look dull to my eye were before they had looked pretty good to me.

Unbuffed clasps lack the luster and saturated colors of the buffed wood.

I have read that surveys have been done and it was found that women are more attracted to shiny objects. If two similar objects were presented and one was much more shiny, then women seemed to prefer the shiny one.

Since most of my market is to women I am going to have to test this hypothesis by seeing if the shiny clasps sell better. Stay posted.

Even if you don’t sell your work, I think every craftsman want’s his or her product to look the very best. I know I do and I am sold out on the better finishes I have been getting after using the steps I described above.

{ 4 comments }

Turned Wooden Bowl Design

bowl design

Techniques can be easily taught but design is another story. Yet it is probably the most important story in the arts and crafts. In wood turning, refined technique, choice of wood, and grain pattern, as well as finish are icing on the cake but the heart of the issue is design. Without it, the project will never be first class.

It is said that you have to turn several hundred ugly bowls before you begin to turn pretty ones. I have certainly turned my share of ugly, unbalanced and clunky bowls. I am pretty embarrassed when I look at these earlier works. Yet this is how we grow. We start from where we are. We then begin to improve on the design. As our techniques improve we can try more sophisticated designs not possible with more limited ability.

I tend to be a practical person and a bit old fashioned. I feel this is a prerogative of a wood turner in his seventies. My bias is that design should have something to do with function.

As I began to work with larger and larger bowls a design feature began to occur to me. The purpose of a vessel is to contain something. If it is a large vessel, it will contain a lot of something, be it holiday salad, fruit or whatever. That means that the vessel, in this case I am thinking of a large bowl, will be fairly heavy.

Smooth flaring curves of a large bowl’s outer wall can be a bit slippery, especially if oily or wet. So I had the idea to substitute raised beads on the outside of the bowl in place of indented grooves or lines. This serves a couple of purposes. First it gives the fingers something more than a curving slippery surface on to which to hold. Thus it is practical. The heavily laden bowl is less likely to slip through the fingers with raised beads to grip. This makes the bowl more functional and, to my mind, better designed.

The second function it fulfills is to break up the long, somewhat visually monotonous curving side of the bowl, giving it more appeal. The long curve is divided into two smaller curves. Now, most would agree that dividing a space into two unequal parts is more visually appealing than making it right in the middle. So by putting the beads nearer to the rim of the bowl makes the division into unequal parts more functional as it is closer to the gripping fingers while the thumbs are anchored on the rim of the bowl. What should the exact ratio be? That is a personal decision. You need to see what works for you. Personal taste varies so there can be no set rule. The golden ratio is a place to start.

How many beads to make and how high again is a personal decision. You can decide for yourself if the bowl pictured above is appealing to you or not. There is no one right or wrong way.

Is this something new? My answer to that is that there is nothing new under the sun. Everything has been thought of and expressed before. All ideas and forms exist in nature and we merely recall what we have seen or experienced. No need to take credit for what nature has already done. So, best to be careful to claim authorship of a creation. Go to a museum and learn to your chagrin that artist thousands of years before you had done the same thing. Look at nature and you may see that idea expressed in hundreds of forms.

In fact, it is good training in design to go to museums and see what the ancient were doing with design. It is good to be alert to the magnificent design ideas nature has provided us everywhere we choose to look, from the smallest of the small to the biggest of the big. Design is all around us. When we are alert to it, we see it everywhere.

By studying these examples of nature and man we can see what works for us and what does not. Then we can begin to incorporate these features into our work. At that point, design begins to take on the aspect of a great adventure. As Mae West said: "It ain’t what I do, Honey, it’s how I do it." We all copy, it is just how we copy those ideas into our art that makes the difference.

So, my advice is to be bold. Try new things. Find out for yourself what works and what doesn’t. The possibilities are infinite. There is no joy in smallness, joy is in the infinite, the Vedic wisdom reminds us.

{ 1 comment }

Coring Bowls

coring a bowl on the lathe

I met a wonderful man in Etna, New Hampshire. He lives just up the road from my daughter and she sent me a newspaper clipping about him. A rugged individualist, he graduated from high school and decided he wanted to turn bowls for a living. He as been doing just that ever since His specialty is turning beautiful burled wood bowls and the newspaper article showed him with a burl so large that it had to be pulled off the pick up truck with a tractor. After reading the article I wanted to visit his shop. He very generously ended up spending the whole afternoon with me and even gave me a lovely log of crotch butternut to take home.

I had been reading about coring bowls for a long time. It seemed a bit complicated and there were several types of tools to choose from. I turn a lot of bowls and this produces a lot of shavings from removing the waste wood from the inside. I know this because I have to bag and carry out these shavings from the shop. My neighbors and friends are just about saturated with free mulch and I put as much on my garden as the earthworms will eat.

So when I visited my New Hampshire turner, whose name is Dustin Coates, I asked his opinion about coring tools and techniques. His reply was to core a bowl on the spot for me to see. It was amazingly simple and looked rather easy. Using this technique one can get two or even three bowls from a single bowl blank. It results in a saving of valuable wood. Often I would lament that I had turned the prettiest part of the wood away in removing the wood that had occupied the cavity of the bowl. If you sell bowls, as I do, then it produces extra income from the same amount of wood. Actually I found it took less energy and less time to core a bowl than to dig all the wood out with a gouge. Last but not least, it dramatically reduces the amount of wood shavings left over after the bowl is completed.

My friend, Dustin, suggested that I get the McNaughton system and which of the many sized and curved cutting tools were most useful to him. He even suggested that a pair of vise grip pliers would substitute well for the more expensive handles and you can see me using his suggestion in the top photo. What I really like about the system I purchased is that you can match the curve of the coring tool to the outside dimension of the largest bowl blank. This gives you more flexibility in determining the most aesthetically pleasing shape of the largest bowl you get from the chunk of wood. Some coring systems I have seen limit you to the same shape which is half of a sphere. This is fine if all you want to do is make a set of nesting bowls but but if you want to create designs with more subtlety and variety you need a system like McNaughton.

It is interesting to me how we are always searching for more. That is just the nature of life. I wanted more bowls, less waste, less work and less shavings and now I have all four. Yet I did not have to sacrifice design considerations to achieve this. How nice it is that at just the right time there is someone more knowledgeable than you who is willing to share what they have learned. It saves you valuable time and energy by preventing you from going down less productive paths.

cored bowl
{ 1 comment }

Eye of the Beholder

When I was living in Lexington, Kentucky I got a call one day from a friend who said that there was some wood available in the little town of Midway, just a few miles away. Midway is an old and charming little town in the heart of the bluegrass region. I called, and a dentist who owned the land said that I could have some wood.

It turns out that the land hosted a late 18th century inn called the Porter House. Most have heard of a porterhouse steak and that is where it originated. The inn now serves as a dentist’s office and residence. The tree was a mammoth silver maple. The neighbors had complained that if it fell it might damage nearby structures. So it had been cut down. I have no idea how old the tree was but I would estimate that it was over 100 years old.

When I drove into the alley that separated the Porter House from the neighbors I saw an array of bolts of wood with grass grown up around them. Some had fungus actively growing on them. It did not look very appealing to the casual observer. The rounds of wood were so large that I had to saw them in half to be able to lift them into my van and even that was an arduous task. The fresh cut wood surfaces smelled musty and were mottled in their appearance. When I had loaded all the wood I could carry I headed back to the shop to cut some bowl blanks and rough turned them.

What I was dealing with was spalt wood. This is caused by fungus attacking the dead wood. When alive, the tree’s immunity protects it from bacterial and fungal decay. When it dies, these microorganisms go to work to reduce the wood to carbon dioxide and water. Without these necessary aspects of nature, all the wood and leaf litter would stay with us and I don’t even want to think about the fire hazard that would make. The fungus can cause the wood to be black in areas due to formation of fungus spores. In other areas it blanches the natural color of the wood. The final result is very interesting color and pattern variation in the same piece of wood. The black lines may follow the wood fibers and reveal a wavy pattern.

In the past, timber men would regard this as a defect. Spalt wood is softer and less stable than the normal wood. So it would have been relegated to the fire wood pile or just left for the fungus to finish the job. It is not even considered good fire wood because some of the energy stored in the wood has already been consumed by the fungus.

Spalt wood is definitely harder to work than the same wood which is free of decay. It requires a softer hand with the tools and produces some design limitations. Sometimes it just won’t do what you want it do do and the piece must be discarded. However, I think it is well worth the effort for the visual display it produces. People seem to be naturally drawn to the color and pattern variation.

I got several large bowls rough turned from the damp wood and put them in paper bags with the top sealed so that they could dry more slowly to avoid cracking, or checking—as woodworkers call this tendency of wood to split itself apart when it dries unevenly. The rest of the large pieces I covered with a tarp and left to fend for themselves.

Eventually I moved along with my wood to Maryland where I live now. At a show I sold one of those large spalt bowls and the purchaser became my first collector. He and his wife purchased two more bowls from the same wood and then commissioned some large candle holders to hold three inch pillar candles. In the pictures above you see the rough forms before they were turned as well as the finished products. I treasure the remaining pieces of this wood and have turned some of it into wooden jewelry.

So what would be considered trash in another era has found a place of respect with those who appreciate the infinite variety and creativity of nature, even when it is tearing down and not building up. Beauty is in the eye of the beholder. If we have a limited vision of utility, we may overlook some of nature’s hidden treasures. When we are open to all possibilities then we find riches in what others would discard.

{ 0 comments }

Scraping

Every tool has its purpose: scrapers are for scraping, and gouges are for cutting. Some wood turners who are not so knowledgeable feel that scraping wood is not as high a calling as cutting–because it requires fine control to make a smooth surface with a gauge alone. When we scrape, we lightly touch the scraper tool to the spinning wood surface, and remove a fine shaving from the surface. Only a small amount of wood is removed with this procedure. Cutting, on the other hand, means presenting the cutting edge of a gouge on an angle so the tool slices deep into the wood, removing a small groove of wood as the lathe turns. With this procedure, much wood can be removed in a hurry.

scraping on the lathe

Because of its nature, scraping is good for refining shapes, and smoothing out ridges left with gouges. The scraper is a flat piece of metal with a sharp, 90 degree angle edge which smooths the wood. The gouge, on the other hand, has a curved profile and leaves small ridges. The better you get with the gouge the less scraping you need to do, but even then the scraper may be indispensable for certain jobs. Because it removes such small fluffs of wood, it is great for making the ridges left by the gouge blend into one another.

What I have learned from trial and error is that the scraper works better on the base and outside of a bowl than it does on the side walls of the bowl. Used on the side walls (which are thinner and less stable when the lathe turns) there tends to be chatter of the tool, no matter now heavily it is constructed. This tool chatter with the scraper gives uneven cuts in the wall of the bowl that leaves a surface which is less desirable than when the gouge alone is used on the bowl wall. Hours and hours of sanding has driven this lesson home to me many times. Now I use the scraper on the base of the bowl inside and outside, and if I am careful, on the outside wall of the bowl–but at all costs I avoid using the scraper on the inside wall of the bowl.

Now, there may be a lot of individual variation here. Some wood turners may be so good with the gouge that there is little need for the scraper. Others may have learned to use the scraper where angels fear to tread. The point here is that you find out what works for you and others. Each tool does one function best, and the others may only do so so, or not at all. There are many hundreds of designs of lathe turning tools. They all came into being because they served a special function a little better.

But, it is best not to go overboard here. I already have so many turning tools that it is becoming hard to find the special tool I want in the ever growing stack of gouges, scrapers, and other specialized tools on my shavings-cluttered bench. One fellow at my turning club said he had over a hundred such tools. I can’t even imagine finding a special tool in all that clutter. Better to know how to get the most out of a few tools, than to have to reach for so many specialized ones. It saves time and resources.

scraping a wooden bowl on the lathe

The scrapers teach you patience and how to administer a light touch. Bear down on it and you get a nasty catch, or dig-in. Just take lighter and lighter cuts so what comes off the scraper is light fluff. Compared to cutting with gouges, it seems like the progress is very slow. Yet the time taken with very light strokes of the scraper is more than saved when it comes to sanding.

Everything is easy once you know how, but getting to that “know how” stage can be difficult. This is where practice comes in. Fortunately, wood tends to be a very forgiving medium. If you scrape too deeply, then you can gently, and gradually, just take more wood off, until you have a respectable surface.

It is like that in relationships too. Fortunately, like wood, people tend to be forgiving when we err, and we often get to make things right, without destroying the relationship. Yet, in our dealings with others, a gentle and light touch seems to produce the most satisfactory result. Heavy handedness takes much more effort to repair.

{ 0 comments }

Signing Your Woodwork

As one progresses with woodworking skills the home soon gets filled with the products of your handiwork.  The next step is to give gifts to relatives and friends.  If output continues you may turn to selling your work as I do.

People love stories.  It is one of the most important ways we learn. Wood tells a story to those who know how to read the script.  Its pattern will tell you the species of wood and from which part of the tree that piece was taken and how it was sawn.  A good finish will allow you to easily count the annual rings and thus tell  you if the tree was competing for life in a dense forest or was open grown judging by the width of the rings.

So that tells the tree’s story.  How about the story of the maker?  History is nothing more than a composite story.  So the story of the lovely wooden finished piece is incomplete without the story of the maker of the piece.  The maker’s name on the piece allows the historian to know something more.  A date after the name makes it even better because it pinpoints the time in the history of the maker’s life.

Early on I got in the habit of signing my work.  Some of my earlier work was embarrassingly crude.  As I progressed, I improved.  Now you can trace this progress by comparing the dates of the signed pieces.

At first I resorted to carving my name and date into the wood with hand tools.  This proved too laborious as the output increased.  Next I resorted to using permanent magic markers.  They do not do what they promise.  In a few years the ink had faded and could scarcely be read.  You are better off signing things in pencil than ink as the ink fades over time and pencil does not.  The trouble is that pencil is subject to wear on exposed surfaces.

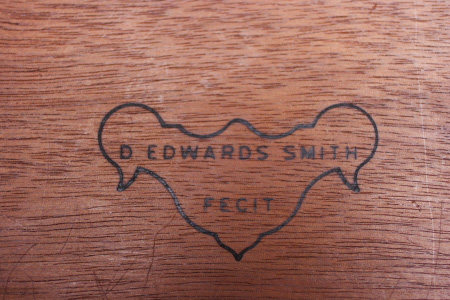
I had a wonderful friend as a medical patient and he ran a machine tool shop.  I asked him to make me a branding iron to put my logo and name on the furniture I was then making.  He did a beautiful job and it is very special to me.

edwards smith fecit branding iron

The logo was an escutcheon from an 18th century Georgian table that I no longer have and my friend is no longer with us.  Yet I have the very pleasant memory of both in my branding iron.  I just heat it up on the top of the stove and press it into the wood.  Be sure to line up the outer edges of the iron on the wood with some pencil marks.  I found it was easy to miss mark the brand when it was hot and you could not see the lettering as it was on the bottom. Many woodworking supply houses will make you your own custom branding iron either with or without a heating element.

The term FECIT appears after my name.  In the middle ages artisans would add this to their name.  It is Latin and is the third person singular form of the verb facto, factare meaning to make.  It gives us the root of our English words manufacture, factory, factor, etc.

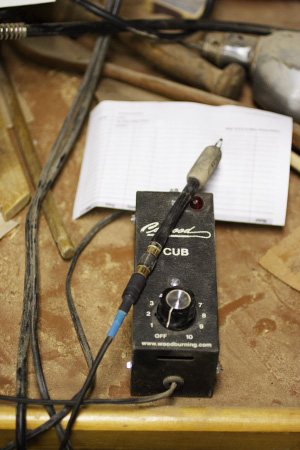
When I made an oval stool with cabriole legs I realized the limitation of the branding iron.  It only works on flat surfaces.  If there is just the slightest unevenness the brand is not complete.  For a wood turner, for instance,  it is just about useless.  So the next thing I tried was a wood burning kit with a fine tip.  It did work but I found that the fine tip would catch in the grain of the wood and make for poor penmanship.

branding iron

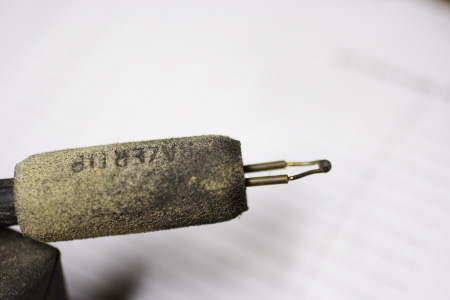
After doing some more reading I got a ball point for the burner.

ball point branding iron

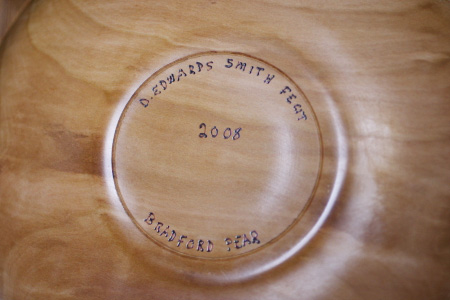
This was much better as it would glide over the grain irregularities as it burned the signature.

better branding

This was fine when I was writing large but when I wanted to sign very small objects it was not very satisfactory.   I make some wooden clasps for knitted shawls and scarfs that you can see on my web site. Using highly figured wood, the two sides of these clasps are often quite different. One person might like one side better than the other.  I found that when I burned in my name and date on one side it meant that the signed side was no longer an option for outer wear.

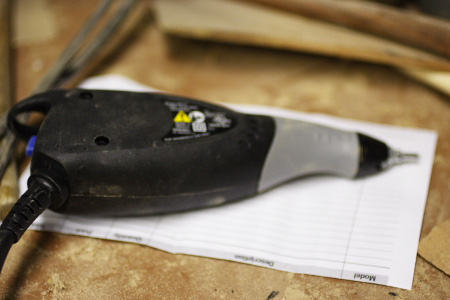
How could I sign my clasps and other small objects unobtrusively?  I began to scout around for finer tools. I came across high speed air driven dental tools that looked great but started at $1000 and required an air compressor.  This was out of my budget and beyond my tight space requirements.  The other day I found an engraver in the Craft Supplies catalog.

engraver

They are a fine outfit that has everything for the wood turner. It probably had been there in previous catalogs but this time it just jumped out before me.  The nice thing is that it was only $24, and that was more like my budget.  Further it would not only engrave wood, but metal and other substances.  It is small enough to be held like a pencil and the carbide point will write as fine a script as your hand can manage.

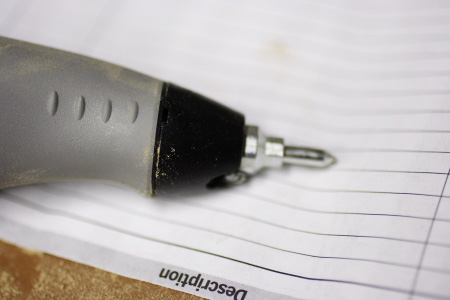
engraver tip

There is a motor attached to the point which produces vibrations that allow
the tip to etch.  The intensity of the vibrations can be controlled to allow you to control the depth of the engraving you do.

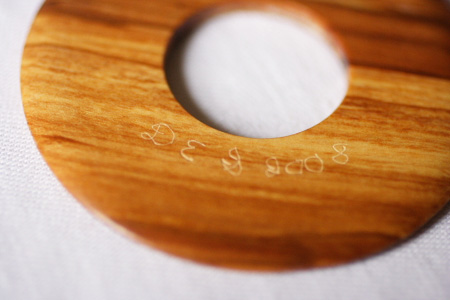
This turned out to be just the thing for my shawl clasps.  I could put my initials and the date on them in such an unobtrusive way that the clasp could even be worn with the engraved side out.

wood engraving

Now the wearer is not limited by which side is showing.  If one wants the engraving to be bolder then there are wax based pigments and coloring agents that are like crayons.  You rub them over the engraving and then rub off the surface excess. The pigment in the recesses cannot be removed and serves to highlight the engraving.  I learned this trick when I watched the accomplished turner Cindy Drozda demonstrate making one of her famous finial boxes.

So these are some of the things I have learned about signing my work.  It is better to give or sell signed pieces. It adds another level of meaning to the one who receives it.  It also provides an historical record of the path you have taken.  This is not meant to be an exhaustive treatise on the subject but just a trial an error record of my attempts.  Hopefully, this may be of help to you.  It seems there is no one method for signing every kind of work but there is one that will work for each specific medium.  So let your creations tell the whole story.

{ 8 comments }

Saving Wood by Coring Bowls

I tend to be frugal by nature. Having turned hundreds of bowls I became aware of the huge amount of wood that was converted into wood shavings. It was a big chore just to clean them off the floor after the end of a day’s turning, and disposing of them also becomes an issue.

I had seen ads for devices to core out the center of a bowl to get another bowl blank from the same stock. However, the thing looked rather complicated and there were so many different kinds of tools and systems from which to choose, that I abandoned the idea.

When I had the good fortune to visit my woodturning friend, Dustin Coates, just outside of Hanover, in Etna, New Hampshire, I noticed that he cored the burl bowls that were his specialty. Burls are expensive and little burl bowls are as charming as the larger ones. When I mentioned that I was thinking about learning to core but did not have any idea of how to go about it, he promptly put a piece of wood on the lathe and in a couple of minutes had shaped the outside and cored out the center. He made it really look easy.

He suggested that I use the McNaughton coring system. It requires that you purchase a set of the knives. Further, they come in small, medium and large sizes, with four knives to a set.

coring tools
Large set on left, medium set on right

He pointed out that the range of curves in the knives allows much more flexibility in the design of the cored bowl blank. Some systems consist of just one knife with a fixed curvature and so all the bowls come out like a nesting set with rather monotonous design possibilities.

He suggested that the most useful sizes for him were the large and medium set of knives. With this you need to purchase the special tool rest that goes in the banjo. I get my coring tools from either Craft Supplies in Colorado or Packard Woodworks in North Carolina.

coring tool coring

This rest has a steel device that goes over the top of the back end of the knife and keeps it from flipping up and hitting the operator in case of a catch. He also suggested that you did not have to buy the expensive handle but could use a pair of straight jawed vise grip pliers just as well. He actually used the tool without any handle at all. I purchased the vise grips and used them a few times but then found it just as easy to use the tool without a handle. Dustin has always been so generous with his knowledge.

What I have learned is that to keep the system working well, you need to keep the carbide cutters on the point of the knives very sharp. For this I use a set of diamond hones starting with a coarser (600) grit and ending up with progressively finer grits until I find the edge satisfactory.

It takes a lot of force to cut a curved arc through a large piece of wood. It is most important to have the tenon plug in the base of the bowl very securely clamped in the chuck. Any looseness is going to give you vibration and poor results and may cause the blank to fly out of the chuck. Yet with a well turned tenon and securely clamped, it provides no major difficulty. As I enter the wood with the knife I move the knife from side to side just about 1/32 of an inch so that the blade won’t bind. At times it will be necessary to back the knife out to keep the shavings from binding the knife. This is particularly true of green wood.

It takes lots of power to do this operation. I have a 1.5 horsepower motor on my lathe and I find that I can core a bowl more easily if I run the lathe at a faster speed. Run it too fast and it is dangerous. So I start out with a medium speed and, if I am stalling frequently, I slowly increase the speed so that the cutting goes smoothly. If I had a more powerful motor this might not be necessary. Larger bowl blanks will require more force than smaller ones.

It is important to feed the knife into the wood slowly and deliberately. Push it in too fast and you will get a catch. You just feel your way along as you advance the blade. A good place to get a catch is when you first enter the face of the blank. Often the face is not exactly true and so you think you will clear the face when you measure it with the tip of the knife only to find that 180 degrees away the face is much closer to the knife point and a catch results. This is particularly true when turning natural edged bowls where the face of the blank undulates to a very great degree. So put your knife where you think is will clear and, with the lathe off, rotate the blank to be sure that it clears all the way around the face of the blank. Then turn the power on and advance the knife very slowly at first. Once the knife is in the wood for the full 360 degrees, it begins to cut more smoothly. A bad catch can pull the blank out of alignment requiring repositioning. Worse yet it could cause the blank to fly off of the lathe. That can be a dangerous situation.

So, how do you tell how to position the knife in the holder to get the right shape of the cored blank? And how do you keep from going too deep and going through the bottom of the larger piece? Some of this is just trial and error. The angle you take with the knife will determine where it will be at the end. If you go in with the knife pointing towards the axis of rotation of the blank, the cored piece will be shallow and much wood will need to be removed from the larger blank that stays on the lathe. If you go in with the knife parallel to, or even slightly away from, the axis of rotation of the blank, the cut will be deeper and you could risk going through the bottom of the larger blank and hitting the metal chuck that holds it on. With practice you will soon learn the correct angle of entry and how thick to leave the large bowl blank wall. With practice you can leave it thinner and thinner. There can be no hard and fast rules as the design of the larger blank is variable and density of the wood varies with the species. It is not as much of a problem as it may seem. In coring a couple of hundred blanks, I have only gone through the bottom of three blanks.

All right, you have advanced the knife into the wood. How do you know when you are done? One way is to keep advancing the knife to the hilt. Sometimes this causes the cored blank to fly off the lathe at hight speed. A better way is to look down the straight part of the handle. A line drawn from the straight part of the handle will intersect with the tip of the knife. When you see that line pointing towards the center of the blank you know that you are almost done. If you stop the lathe and withdraw the knife and tap the inner cored blank with a hammer or mallet, it often will pop right out.
You can tell if it is ready for this because pressure on the side of the inner blank will result in some movement indicating that the stem that holds it to the larger blank is thin and a good mallet tap will cause it to break right off.

Bingo! Now you have one large bowl still mounted to the lathe and a solid cored bowl blank in the other hand. What I have found is that it is much less labor intensive to core out the center of a bowl than to remove the waste wood with a gouge. Furthermore, you have at least one extra bowl blank and if the blank is large enough, two or even three extra blanks. Whether the wood is green or fully dry, the procedure is still the same.

cored bowls
15 inch cored bowl from the center of the 18 inch blank on the right. Yardstick for reference.

Let me pass on some experience that I have learned by trial and error. When you remove the cored blank you have a solid piece of wood without anything that will fit into your chuck. This means you have to mount it between a spur drive center and the tail center to turn a tenon on the base. You may get it properly lined up but you may not. Getting it trued up by turning it true may waste valuable wood. What I have found works best for me is to mount the large blank that you start with and while it is being held in the chuck by the tenon, use a gouge or parting tool to turn a recess with a tenon in the middle of it on the face of the bowl blank. Then core out the blank. The removed core will then accept the jaws of the same chuck which was holding the larger blank. Then when you have finished turning the larger blank you can just put the smaller cored blank in the same chuck and turn a tenon or a dovetail recess to mount the blank in a chuck. Then you can either core a third blank or use a gouge to remove the center waste wood. This way, your extra blank will be aligned properly and will result in less effort and less wasted wood.

You should always be able to get one extra bowl by coring and with skill you can get two or three from the first large blank. It depends on the design and your acquired skill. The advantages of this are obvious. Most anyone would like to get two or three for one. When you add on the advantage of less labor and less waste, it become obvious. Yes, there are extra tools to buy but the extra bowls will soon pay for the cost of them. Finally, you will have the satisfaction of knowing that you have made maximum use of Nature’s precious resources. Life is too precious to waste any part of it.

{ 2 comments }

Turning a Chess Set

Back last summer one of my TM students, who is also a collector, asked me if I would turn a chess set for him. I was very flattered by his offer and said I would look into it. About nine months later I finished the job.

Now I don’t know much at all about chess. I started to learn the moves when an Eastern European yard man gave me some instruction when I was about ten. It never went beyond that. So, how do you design and execute pieces for a game about which you know very little?

One of my champions has been my son. At age four he told his Montessori teacher that his Dad could make anything. Since then I have been accepting new challenges without bothering about the fact that I really did not know how to do the job at the time.

Another great influence on my life was a Mr. Tom Hodge. Possessing only a high school education, after a career at NASA, this man went on to build his own machine tool shop which was so sophisticated that he ended doing work that NASA could not do for itself. When I knew him as a patient in Newport News, VA, his modern machine tool shop was 50,000 square feet.

He told me that people would come in and ask him if he could do a certain job for them. He would invariably say yes even though he knew nothing about the job to be done. He said he would think about it, sleep on it, get information from all the sources he could find, talk with the experts he surrounded himself with in his shop and begin to try this and that. Eventually he would come up with the finished product. Often it was something which had never been done before. He showed me an example of this one day. It was a railroad car filled with measuring devices. It was towed behind a train at 90 miles an hour and would give you a reading of the track conditions every ten feet.

I greatly admired this “can do” attitude and have tried to implement it whenever the chance arose. So, the first thing to do, it occurred to me, was to get more information. My attention was led to a very valuable resource. Mike Darlow is a professional woodturner and woodturning educator. He has authored many scholarly works of woodturning and woodturning design. It was just my luck that he had recently published a book called Woodturning Chessmen. Sounds like he wrote it just for me.
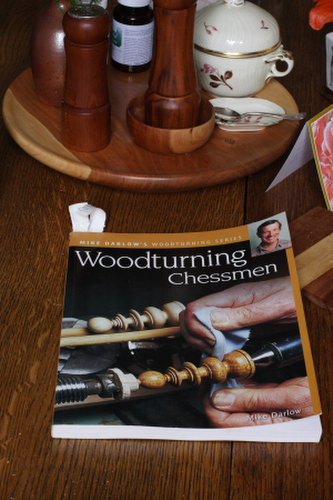
In his usual scholarly way, Mr. Darlow went into the history of chess, tracing its origin back to ancient India where it had been designed at a teaching exercise about the art of warfare. He showed the evolution of the chess pieces from India, through the Middle East and then up through Eastern and Western Europe culminating with the “standard” Staunton design that is so popular today. Staunton was an English chess enthusiast and champion who desinged the pieces that bear his name in the middle of the nineteenth century.

Mr. Darlow not only presented chess men designs over the past 1500 years, he also devoted many pages to the principles of design according to his point of view and many pages to the actual construction of the pieces. It was a real treasure trove and everything was at my fingertips in one volume. After reading this very interesting book I loaned it to my friend and student who had commissioned the work, and asked for his feedback which he duly gave me. I was interested to see if any design particularly appealed to him.

It was very kind of him to suggest that he wanted me to come up with my own design. He suggested certain ideas which he liked better than others but hinted that he really wanted me to be original. Being a collector, originality was high on his list of desirable qualities.

So, what does being original mean? What is truly original? You know that old saying that there is nothing new under the sun. I personally believe that there is a field of unmanifest reality in which resides all forms and ideas in seed form. I think that when we are creative we are just remembering those seed ideas. Some have more access to that level of reality than others. Yet, if that is unfamiliar to us, then we don’t have to look far. Those same seed ideas are repeated over and over in nature. Since they are the blueprints of nature, we see them in all that we see. Therefore it is a bit presumptuous for us to take credit for what nature has already created.

After giving this a lot of consideration I think that what we mean by creative and original is how we put together the parts of what has already been created. Even that may be debatable but at least it gives us credit for some level of creativity or at the very least the ability to “see” those combinations in our mind’s eye.

On the other hand, my client’s order for originality put the burden on me. It would be relatively easy just to copy one of the many patterns in Darlow’s book. So what it boiled down to was how do I see the game of chess as reflected in the turned pieces. My reasoning was that as a game of war strategy, the pieces should reflect that reality. The pieces should be “writ large” and the flavor should be masculine. This left out the many intricately turned rococo pieces of the late 17th and 18th centuries illustrated in Darlow’s text. Even the Staunton standard pieces failed to capture that flavor, in my opinion.

One of the things I have learned is that the creative process is not to be rushed. Mr. Hodge would take a lot of time to think and sleep on his ideas before completing a job that had not been done before. So I began to turn these thoughts over in my mind. The first decision was the choice of wood for the pieces.

Most would agree that in war there is one side that tends to represent good values and one side that opposes them. The Mahabharat is the classic epic in Indian Vedic literature in which a ruling family had turned against part of itself in pursuit of less than honorable goals. This epic is very dominant in Indian culture and probably lay in the awareness of the creators of chess. Therefore, one set of men needs to represent the good and the other side opposition to good. In other words there needs to be a clear color contrast to represent that idea as well as to be able to tell the pieces apart on the board of play.

Now some woods are more turner friendly than other. Some tend to splinter and tear out under the tool’s edge and others remain firm. So, I thought to myself, what wood would best suit the side aligned with goodness? It needed to be light colored and at the same time have a rich appearance. My choice was holly. It has almost no grain appearance. Being an evergreen it grows slowly year round and does not produce the soft early wood and dense late wood seen in a species like oak or pine. When carefully finished it looks almost like ivory or stone. It has a very regal appearance and it is almost snow white.

For a contrasting darker wood my choice was cherry. Cherry is one of my favorite woods to turn. It handles well, is hard and uniform in texture. It has a lovely rich color which slowly darkens with exposure to sunlight. The more it is handled, the prettier it gets. Thus the light holly and darker cherry would give good color contrast. Some makers resort to making the pieces of a light wood and painting one set black. My feeling is that black draws the wrong kind of energy to it and I prefer to avoid black whenever possible.

With the choice of wood settled, now I had to decide on the size of the pieces and their size relationship with each other. My client had some specific ideas about this and I went with his instructions. The king was to be about 3 3/4 inches tall.

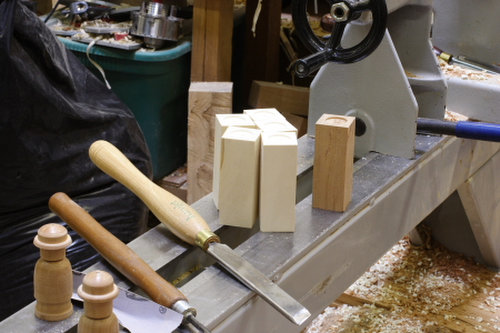
With the dimensions established, it was time to prepare the wood blanks. I am always starting with rough wood. So the wood was band sawn and put through the planer. I would then smooth one edge on the jointer. Now it was ready for the table saw to cut the proper width, height and length. The results are shown in the photo below.

I wanted to add weights to the bottom of each piece to keep them from tipping. To do this I marked the center at both ends and then drilled an indentation in the base with a Forstner bit to accept the lead insert. I had some sheet lead and used a set of gasket punches to cut out discs and drilled the indentations so that the lead discs would just fit. They could then be secured with a drop of cyanoacrylate glue.
Now I had to start coming up with specific designs. As I looked through Mr. Darlow’s many illustrations, I became aware that there was no single set in which all the pieces appealed to me. I realized that each piece would have to fit in my “wholeness idea” of being severe and somewhat war-like.

So I started at the top with the king. After several experimental trials I settled on the design.
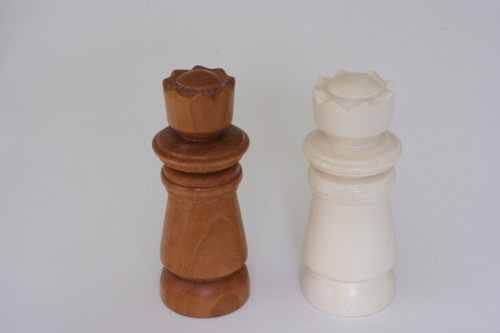
king

Then followed the queen. It had to be apparent that she represented a feminine form but I still wanted her to fit in with the overall design which was solid and substantial.
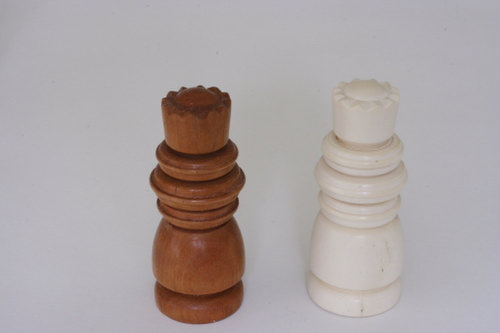
queen

Going down the scale of rank I next turned to the bishop. In the Staunton set he is shown wearing a mitered hat. However, clerics also wear other hats and I saw some represented in Darlow’s book and adapted one to my taste.
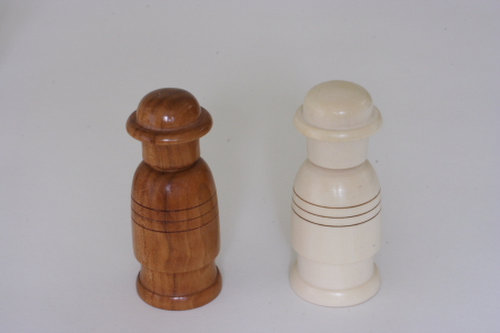
The knight has been represented as a carved horse’s head. Aside from the association with cavalry this piece does not really evoke a war game to me. Again I saw a small head with a armor helmet with a small vision slit in Darlow’s book. I made the head bigger and used it for my knight.
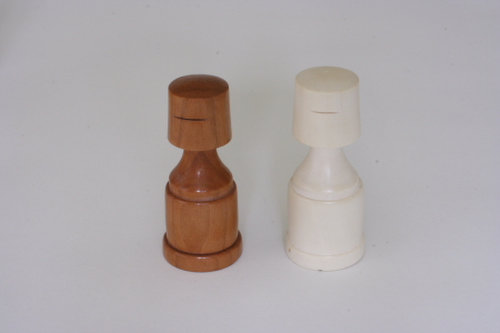
The rook was the final piece and was fairly straight forward.
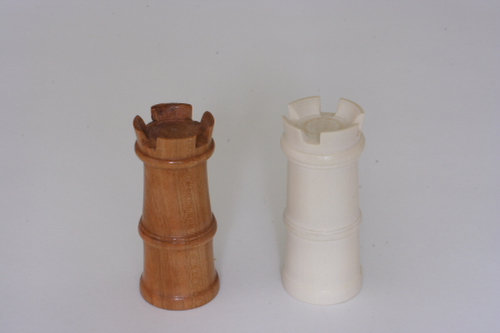
Details of the crowns on the king and queen as well as the openings in the turret of the rook had to be hand carved with a carving knife. One of the tricks I learned from the Marlowe book is to use the indexing stops on the lathe. Before I turned the parts off I used the indexing stops. Keeping my pencil flush with the tool rest I would make a mark on the piece at each appropriate interval. This way all the intervals were evenly matched and then it was no problem for the carving knife to follow the pencil mark to finish the detail on the piece.

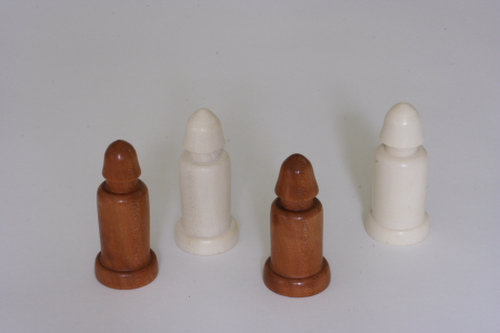
All that remained was to design the pawns. Most of the sets I have seen really do not do much justice to the concept of a pawn. A pawn in a war game is a common soldier. So I settled on small man-like figures with primitive helmets. Now the design was set. I was ready to start turning in earnest.
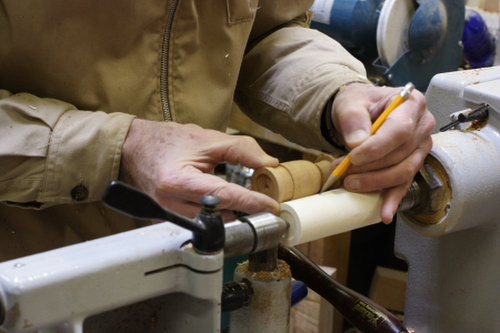
The first step was to turn the blanks round with a roughing gouge. The picture below represents this step.

Next I used a pattern piece to mark the critical dimensions on the round blank. In furniture making they use something called a story stick. It is a thin flat piece of wood with the pattern of the piece cut in two dimensions and then meaningful data written on the stick. It is used to lay out marks for sawing out the piece. I have learned from my own turning experience that if you have an original you can lay out the critical marks right on your work piece without having to fuss with a lot of measurements. Measuring is not something that comes easily to my free spirit. So here I am holding a previously turned bishop in cherry against a holly blank and transferring the marks directly to the work piece. This system works very well for me and saves a lot of time. If you ever go back and want to recreate the set or a piece, having a pattern piece saved for that purpose will greatly simplify the process.
Next I cut the critical marks into the wood with the skew chisel. The skew is a good tool to learn to master. It is ideal for doing many tasks in spindle turning. Like many others I had problems with it. We had a turning demonstration at our local woodturning club (Baltimore Area Turners) and the presenter was Bill Grumbine, a well known turner and wood turning teacher. He was showing us how to reproduce spindles. He explained to me that the real secret is to have your skew very sharp. By that I mean shaving sharp.

After dressing the tool with my Wolverine sharpening jig (with the skew attachment in place on the bench grinder pictured in the background of the pictures) I take the skew and dress the edge with a diamond hone using first the 600 grit side and then the 1200 grit side. Next, I strop the edge with 7 micron diamond paste on a porous strip of wood followed by 3.5 micron paste. I get my diamond paste from Wood Carvers Supply, Inc. in Englewood, Florida. This produces a really keen edge. The tool can be touched up with just the diamond hone and the diamond strop to refresh the edge for many times before the edge needs to be reground.
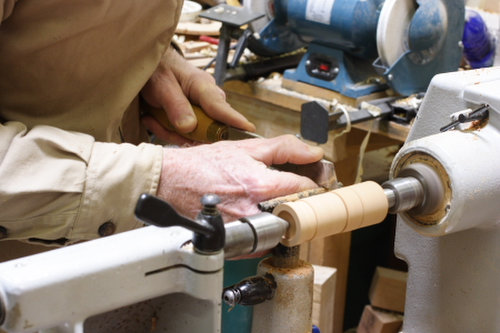
Here I am beginning to cut the design into the blank.

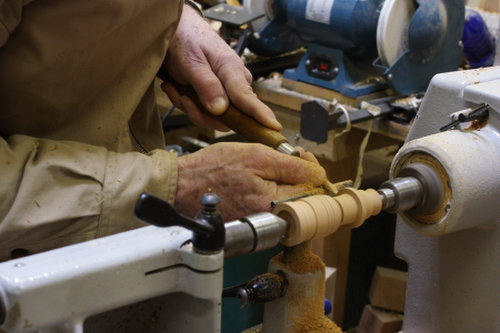
In the picture below I am using a tool I had to design myself. My skew chisels were too wide to fit down in the narrow coves and grooves of the pieces. Some time ago I got some engine valve stems from my local garage. There were smaller ones from passenger cars and larger ones from truck engines. The steel is very hard. I cut off the head and this left me with the straight shank which I fitted in a tool handle and then waited until I had a use for it. When it was needed I used the grinder to make the shape of the cutting edge and then did the final sharpening with the system I described above. Now I had a very small skew to work into tight places.
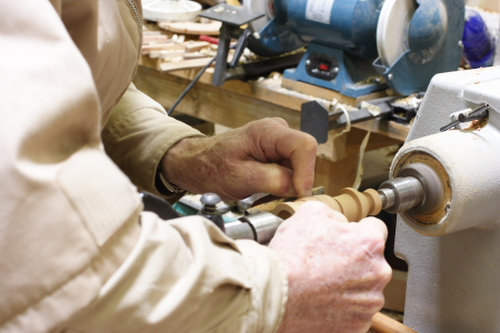
Another trick I learned from Bonnie Klein I am using below. I wanted some accent lines in the otherwise monotonous robe of the bishop. I first cut these lightly with the skew and then use a wire to burn in the line to make it more visible. You can use most any kind of wire. This one happened to be inside a twisty tie and is quite thin. I have taken wire out of electrical cable or from other sources. You just hold the wire in the grove as the wood spins until you get the darkness you desire. You can buy sets of wire made just for this purpose but it is easy to make your own and the price is right.
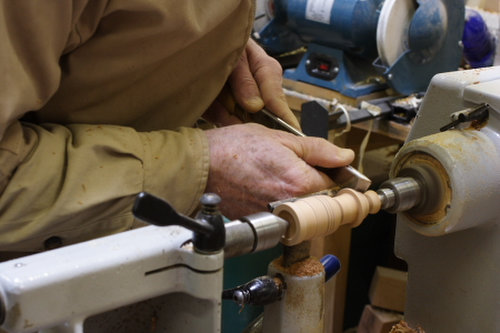
Here you see the finished bishop being parted off with the skew.
After doing the hand carving and final sanding I had to make some decisions on the finish I would use. I did not want to sacrifice the whiteness of the holly with oils and shellac which impart color so I just buffed it with white diamond abrasive and finished with carnauba wax with the Beal Buffing System I have described in earlier blog posts.

With the cherry pieces I followed my usual routine of a coat of Bull’s Eye shellac. After this was sanded down carefully and rubbed with 0000 steel wool, I applied a coat of tung oil. I have found that placing newly finished articles on the floor next to the forced air heating vent speeds up the drying of tung oil and Danish oil products. When good and dry I buff using the three part Beal Buffing System.

I used my engraver to put my name and date on the bottom of the pieces. This picture also shows how the lead wafers fit into the recess at the bottom of the piece. This system allows the lead weight to be at the lowest point in the piece to give maximum stability.
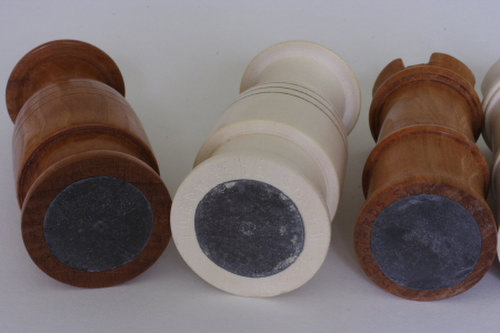
Here is the finished product assembled.

Doing something you have never done before is a challenge, but it is what leads to growth. It is the nature of life to grow towards more and more. If we stop growing the rest of nature does not and we find ourselves left behind. I guess that is why my friend Cliff Hodge was so successful. He never turned down an opportunity for growth.

{ 12 comments }

Part and Wholeness in the Wood Shop

In the recent blog entry I posted on saws it might be fun to amplify the central idea which was discussed. That was how do you make sense when there are so many different facts to consider. The world is awash in data. We double the amount of knowledge every few years or so and to some it seems like every few weeks. Now with the internet giving us access to knowledge from all over the earth, the task of making sense of it all is a bit daunting.

I was extremely fortunate to have been introduced to Vedic wisdom by Maharishi Mahesh Yogi, who founded the TM movement. In earlier blog posts I credited my starting the TM technique for my explosive increase in interest and capability in woodworking some 34 years ago. What I learned from Vedic wisdom, which is the oldest tradition of knowledge in the world today, is that if there are parts there has to be wholeness. Without the concept of wholeness the idea of parts would be meaningless. Parts only have meaning if understood in terms of being parts of a greater wholeness.

You have often heard that saying: “The whole is greater than the sum of the parts.” In some way wholeness is quite different than a collection of parts. It is a transcendental value. It can be described with terms like infinite and unbounded. Wholeness is infinite, more than the most, and that is a transcendental value. It goes beyond the boundaries of lists and collections. If it is a transcendental or non-material value, what is its practical value?

To answer this, let’s come back to the concrete example we discussed in the blog entry about saws. Think about a single saw. It has a motor, a mechanical drive to connect the saw to the blade. There is a way to adjust the depth of cut of the blade. There is some sort of table to hold the wood being cut. There needs to be some sort of stand to hold the saw and it may be mobile by adding a base with wheels. The motor is made on innumerable parts. There is an armature, windings of copper wire if it is an electric motor. There are switches to turn it off and on. If it is gas powered, then there is a piston, connecting rod, gas tank, oil reservoir and housing. Don’t forget that saw blades come in a dizzying array of widths, thicknesses, number of teeth per inch, arrangement of teeth, types of steel used in the teeth, the set or rake of the teeth, etc. The list could go on but you get the point.

Now consider how many different manufacturers of saws there are. Some are no longer made but still work today. Every manufacturer may make many different models of saws. There are different sizes and different price ranges.

Saws are designed for different purposes. Some cut thick wood, some thin wood, some cut straight cuts, others cut curved cuts. Some cut at right angles and others cut on a bevel.

What we have here is a point, in this case the saw, expanding to an infinity of parts. In the concept of a saw we see that it gives rise to innumerable parts with dizzying speed. How can we ever make sense of all the parts? We just get overwhelmed.

Yet we don’t need to know about all saws and we probably don’t need to know all about any particular saw. What we need is a wholeness point to begin. In my last blog post I tried to explain how my collection of saws allow me to take advantage of a valuable resource. namely, found wood. This is wood discarded by others as it has no value to them. Yet what I see is beautiful bowls and utensils hidden beneath the shabby exterior.

So my approach to saws starts from the wholeness point of converting found wood into wood I can use in my shop. The saw used first is the chain saw. This can cut big chunks of wood into more manageable size pieces which can be lifted without heavy equipment. It can also be used to cut rough dimensional lumber with the proper attachment or by freehand.

The next saw is the large bandsaw. This allows me to dimension the rough wood into more carefully dimensioned pieces and also allows me to cut curves. If I need to cut smaller radii then I use my smaller bandsaw. My table saw comes into play when I need precisely dimensioned wood for furniture or pieces for spindle turning when I make many copies of the same thing. If I have a very long plank that needs to be cut into shorter pieces, I use my cut off saw with its long table. If I need some very small parts then I may use my scroll saw which can cut thin wood into amazingly intricate and complex shapes.

So, all my saws play a role in leading me to the one goal of making use of found wood. Of course some of the same saws work fine on commercial dimensioned lumber. It is just that I rarely have occasion to buy any of that. Everything fits together nicely and nothing is redundant or unneeded. The parts make the wholeness of my woodworking goal.

Now, when I look for a saw, it has to fit into the wholeness of my shop goal. I don’t get confused about saws that don’t fulfill my specific purpose. I don’t need to check out every model and every manufacturer. I don’t have to have one of everything. I don’t have to have an infinitely large shop. It is big enough as it is, thank you.

So how do you figure out what is the wholeness part? The secret I found was to allow my attention to go inward. For that I have a technique which is the Transcendental Meditation program. I have leaned that at my source I am infinite and unbounded. I am made of wholeness. Everything I could ever want is there. As I regularly contact that field of wholeness I begin, over time, to bring that wholeness with me when I come back out into activity.

This gives me two fullnesses. It brings infinity out into the boundaries of specific parts. Now I can operate among all the parts without getting lost in the specific parts because I always have my eye on the wholeness or the infinite. This is the best of both worlds. I can operate in the parts but not get lost in them.

This ability to see wholeness while immersed in the parts can be developed by anyone. Even I learned how to do that. I just wish I had known how to do that when I was a medical student studying anatomy. Talk about being lost in the parts, that was the quintessential experience.

So, trying to operate without wholeness is to be equipped with only half of what you need. Perhaps this is why for so many, life is a struggle.

{ 0 comments }