As one progresses with woodworking skills the home soon gets filled with the products of your handiwork. The next step is to give gifts to relatives and friends. If output continues you may turn to selling your work as I do.
People love stories. It is one of the most important ways we learn. Wood tells a story to those who know how to read the script. Its pattern will tell you the species of wood and from which part of the tree that piece was taken and how it was sawn. A good finish will allow you to easily count the annual rings and thus tell you if the tree was competing for life in a dense forest or was open grown judging by the width of the rings.
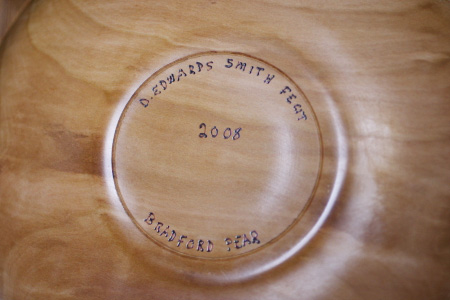
So that tells the tree’s story. How about the story of the maker? History is nothing more than a composite story. So the story of the lovely wooden finished piece is incomplete without the story of the maker of the piece. The maker’s name on the piece allows the historian to know something more. A date after the name makes it even better because it pinpoints the time in the history of the maker’s life.
Early on I got in the habit of signing my work. Some of my earlier work was embarrassingly crude. As I progressed, I improved. Now you can trace this progress by comparing the dates of the signed pieces.
At first I resorted to carving my name and date into the wood with hand tools. This proved too laborious as the output increased. Next I resorted to using permanent magic markers. They do not do what they promise. In a few years the ink had faded and could scarcely be read. You are better off signing things in pencil than ink as the ink fades over time and pencil does not. The trouble is that pencil is subject to wear on exposed surfaces.
I had a wonderful friend as a medical patient and he ran a machine tool shop. I asked him to make me a branding iron to put my logo and name on the furniture I was then making. He did a beautiful job and it is very special to me.
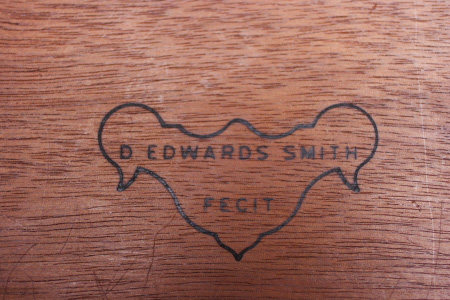
The logo was an escutcheon from an 18th century Georgian table that I no longer have and my friend is no longer with us. Yet I have the very pleasant memory of both in my branding iron. I just heat it up on the top of the stove and press it into the wood. Be sure to line up the outer edges of the iron on the wood with some pencil marks. I found it was easy to miss mark the brand when it was hot and you could not see the lettering as it was on the bottom. Many woodworking supply houses will make you your own custom branding iron either with or without a heating element.
The term FECIT appears after my name. In the middle ages artisans would add this to their name. It is Latin and is the third person singular form of the verb facto, factare meaning to make. It gives us the root of our English words manufacture, factory, factor, etc.
When I made an oval stool with cabriole legs I realized the limitation of the branding iron. It only works on flat surfaces. If there is just the slightest unevenness the brand is not complete. For a wood turner, for instance, it is just about useless. So the next thing I tried was a wood burning kit with a fine tip. It did work but I found that the fine tip would catch in the grain of the wood and make for poor penmanship.
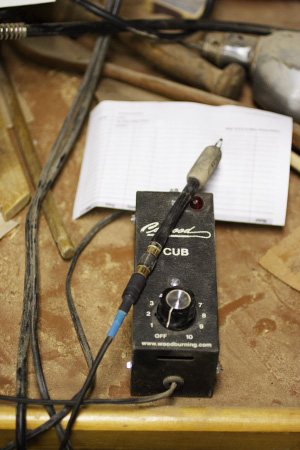
After doing some more reading I got a ball point for the burner.
This was much better as it would glide over the grain irregularities as it burned the signature.
This was fine when I was writing large but when I wanted to sign very small objects it was not very satisfactory. I make some wooden clasps for knitted shawls and scarfs that you can see on my web site. Using highly figured wood, the two sides of these clasps are often quite different. One person might like one side better than the other. I found that when I burned in my name and date on one side it meant that the signed side was no longer an option for outer wear.
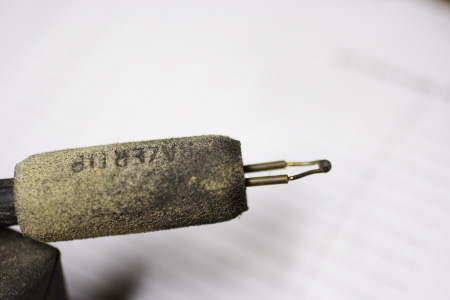
How could I sign my clasps and other small objects unobtrusively? I began to scout around for finer tools. I came across high speed air driven dental tools that looked great but started at $1000 and required an air compressor. This was out of my budget and beyond my tight space requirements. The other day I found an engraver in the Craft Supplies catalog.
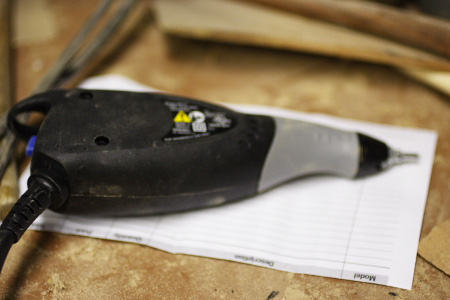
They are a fine outfit that has everything for the wood turner. It probably had been there in previous catalogs but this time it just jumped out before me. The nice thing is that it was only $24, and that was more like my budget. Further it would not only engrave wood, but metal and other substances. It is small enough to be held like a pencil and the carbide point will write as fine a script as your hand can manage.
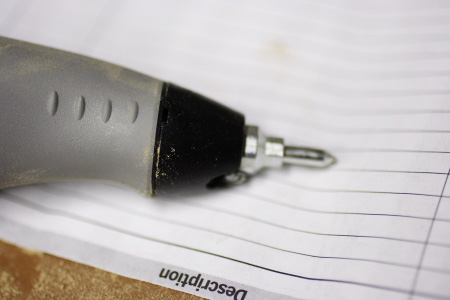
There is a motor attached to the point which produces vibrations that allow
the tip to etch. The intensity of the vibrations can be controlled to allow you to control the depth of the engraving you do.
This turned out to be just the thing for my shawl clasps. I could put my initials and the date on them in such an unobtrusive way that the clasp could even be worn with the engraved side out.
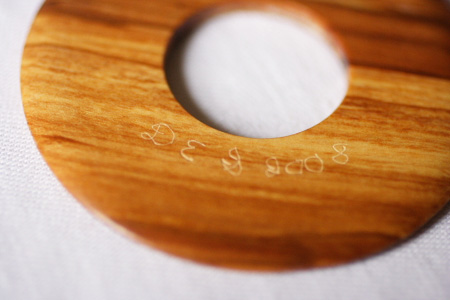
Now the wearer is not limited by which side is showing. If one wants the engraving to be bolder then there are wax based pigments and coloring agents that are like crayons. You rub them over the engraving and then rub off the surface excess. The pigment in the recesses cannot be removed and serves to highlight the engraving. I learned this trick when I watched the accomplished turner Cindy Drozda demonstrate making one of her famous finial boxes.
So these are some of the things I have learned about signing my work. It is better to give or sell signed pieces. It adds another level of meaning to the one who receives it. It also provides an historical record of the path you have taken. This is not meant to be an exhaustive treatise on the subject but just a trial an error record of my attempts. Hopefully, this may be of help to you. It seems there is no one method for signing every kind of work but there is one that will work for each specific medium. So let your creations tell the whole story.
It is a really great idea to sign your work, it’s kind of like giving yourself a pat on the back after all the woodwork you’ve done.
Dear Rob:
Thanks for reading my blog and sending a comment. More than giving yourself a pat on the back you are creating
a historical document. What you feel good about making now may make you blush a few years from now. I note
that my work is constantly improving and since I date all my pieces as well as sign them I have a record of that
improvement. Signatures and dates may have special meaning to family members and friends. If ever your work should find wider acclaim, signatures and dates will be even more important in establishing value.
Excellent commentary, recommendations and education on signing your work. I hope more woodworkers and other professional artisans read your story and start signing their work. So many woodworker, woodturners and other artists do not realize the value their signature on a piece has to the recipient. Whether the item is a gift or a purchase, knowing the maker very frequently adds significantly to their appreciation of their acquisition.
Dear Paul:
Thanks for your thoughtful comment. Giving a piece a date and name fixes it in the endless stream of sensory experience that flows through us and allows us to come back and reflect at leisure.
I’ve been trying to figure out a way to sign my work. This was very helpful, thanks.
Dear Shane:
Everything is easy when you know how. That is why I love the internet. You can share what you know with so many people. When I used to collect antiques I saw that signed and dated pieces always carried a premium price. Besides, it will mean so much to future members of your family to have a piece signed and dated by you.
Just the information on signing my pieces that I needed. Thankyou.
Dear Angie:
Thanks for your comment. There is more information I would like to share. Burning works well in dense woods with little difference between early and late wood in the annual rings. But more open grain woods like oak, pine, etc. make the burning tip skip over the late wood and then burn deep in the early wood. It looks like a lot of dots and is not so attractive. Now I engrave on the band of late wood. The signature is not so large so to make it stand out I use a q-tip dipped in paste wax and then dipped in some powdered pigment the color of your choice. I carefully apply this to the engraved signature and rub it down in the engraved letters. Some will smear on the surface. I just sand this away. The sanding does not reach down into the engraved letters and they stand out nicely. I learned this from Cindy Drozda who makes small boxes with elaborate finials.
Sincerely,
Edwards Smith