Last year I got a letter from a wooden spoon collector named Norman D. Stevens of Storrs, Connecticut. It seems that he became interested in collecting spoons by American woodcarvers. One of his internet searches pulled up my name and he sent a letter inviting me to contribute to his growing collection which I did.
The more I thought about this, the more I appreciated what Norman is doing. He is documenting the state of wooden spoon making throughout the world in the early 21st century. Norman has complied a directory of perhaps as many spoon makers he has identified, and is maintaining hard copy files with background information and correspondence with many of those artisans.
More importantly, he is creating a catalog describing each contributor to his collection and his or her spoon. A number of his spoons are on display through May 23, 2010 in an exhibit at the American Association of Woodturners in Saint Paul, MN.
Norman Stevens Spoon Collection Display
There will also be a special display of many of his spoons, with presentations by Norman, at the AAW Symposium in Hartford, CT from June 19-20, 2010. That exhibit is open to the public without charge. Further information can be found at: http://www.woodturner.org/sym/sym2010/. AAW will be issuing and selling a catalog for the exhibit at the Symposium that will contain color images of about 100 of the spoons. There is also an exhibit scheduled for the Gallery-on-the-Plaza of the Homer Babbidge Library of the University of Connecticut. If you are interested in his project his e-mail is: normanstevens@mac.com.
What a nice thing to do! Spoon makers are not exactly in the spotlight of American woodworking so to pay tribute to the many fine craftsmen who devote their energies to spoon making is like a breath of fresh air to me.
Spoons Got Me Started in Woodworking
It turns out that wooden spoons were my first venture into woodworking as an adult. I had cut down a maple in my back yard to make some light for a vegetable and rose garden. The wood was so pretty and white that I couldn’t bear to split it all for firewood so I saved a log or two.
By the time I got around to a project with the maple it had spalted nicely. My first impression was that the wood was ruined but the more I worked with it the more I came to appreciate the spalting. As I learned more, I realized that I had cut a curly maple log that had spalted and then I wished that I had saved the whole tree.
There are as many ways to make a wooden spoon as there are wooden spoon makers. I thought I would just share some of my thoughts about the craft. A test I once took indicated that I was a pragmatic idealist. That sounds like a bit of an oxymoron but it really does describe two opposite aspects of my character.
Spoons For Looking And Spoons For Cooking
I do appreciate the intricate work of spoons with all of the delicate cut out work, but the spoons I wanted to make were to be used in cooking. Every fine cook knows that nothing beats a good wooden spoon. So my spoons had to be practical and built to last.
My first ones were a bit clunky but seemed to please the intended users. On the other hand, I wanted my spoons to reflect the beauty of nature stored in the wood and that this be set off by some refinement of the design.
One thing I looked for in the design was a sturdy handle. The flimsy ones from the box stores are too easy to break. I wanted ones that would hold up to the hardest tasks. I got an e-mail from one of my customers this year. She said the spoon I made for her was the only one that was up to stirring her fruit cake batter and it was her favorite spoon. That appealed to the pragmatism in my nature.
Taking Advantage of Wood Grain
As I learned more about woodworking I realized that making the handle parallel to the direction of the grain made for a handle which was stronger and not quite as much mass was needed to keep the handle sturdy.
With more experience I learned that the grain does not always run straight in every piece of wood and that it was alright to have the handle curve this way or that following the grain of that particular log. In the colonial days the wood for spoons was rived with a froe (a metal blade which was pounded into the end grain). This caused the wood to split right along the path of the grain and all handles produced in this manner had handles which followed the grain.
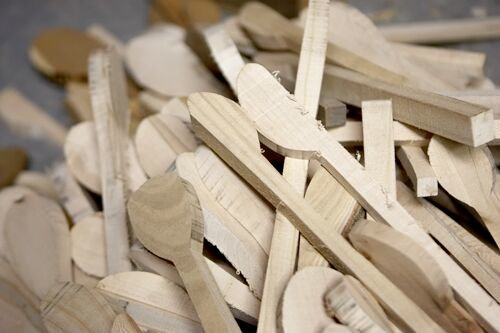
Some still rive the wood for spoons and this is a fine way to make them. Yet I need to do production work as I sell many spoons at craft shows. They are one of the most consistent sellers. I have probably made more than a thousand spoons and so now I cut my blanks from wood which has been sawn into planks with the band saw. The band saw is such a useful tool as it allows you to make planks out of any log or branch that comes your way.
Below is a picture of a few of my spoon blanks.
Another thing I learned is that cooks like spoons that are not completely symmetrical and they like odd shapes. It may help them locate their favorite from their collection and the odd shape or curved handle may be just what is needed for a particular job.
So now I vary my design to suit the wood grain and my whim and just draw the design freehand on the plank. This way it is easy to follow the grain in the handle. I then go back to the band saw and cut the outline drawn on the plank.
Gouging the Spoon’s Bowl
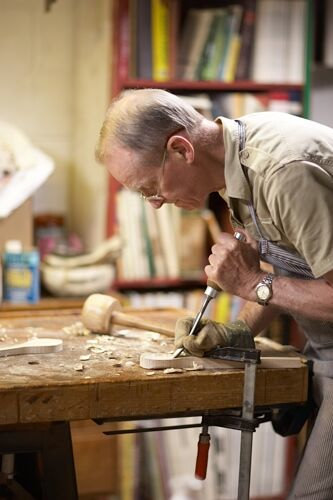
The next challenge is to hollow out the bowl of the spoon. Again, the ways to accomplish this task are numerous. I settled on using a spoon gouge with a curvature that suits the maker. Too shallow and the edges of the gouge will dig into the sides of the spoon bowl… Too steep and you will get deep grooves in the wood and not a smooth flowing curve of the spoon bowl.
The width of the gouge is also a matter of personal choice but I use one wide enough to remove plenty of waste wood with a single pass. I have had a number of bent gouges but they seem to have a propensity to wander off when I do demonstrations and the only one left is one that never leaves my shop. It is a firmer gouge, meaning that it is thicker and will stand up to repeated heavy use. It is the one in use in the picture below.

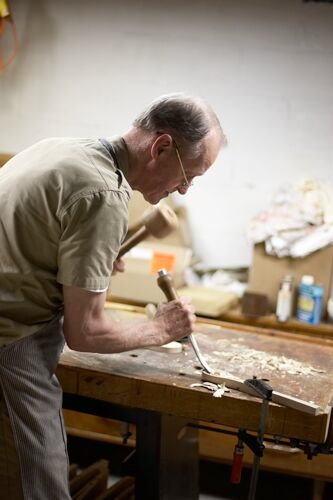
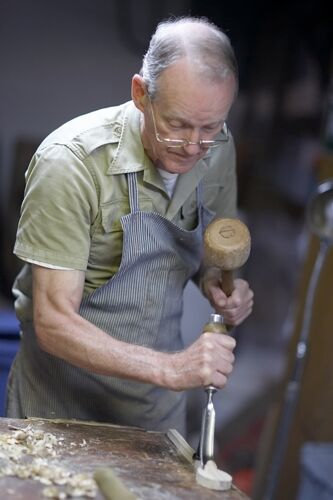
Now unless you are a whole lot stronger than I, you will not be able to push this gouge through the wood for very long using just the muscles of your hands and arms. This is especially true of hard woods such as fruit woods like cherry and apple.
To remove large amounts of wood quickly I use a wood carver’s mallet. The one shown above I made of a dogwood head (very hard) and a hickory handle. Beech also works well.
Notice that the handle of the gouge has a metal ferrule on the end which keeps the wood of the gouge handle from splintering from repeated blows. With these tools I am able to remove large amounts of waste wood quickly. I keep the spoon blank secured to the work bench with a simple clamp.
I start at one end of the bowl and remove some wood. However, if I go too deeply the wood will tend to split and ruin the blank. So I go as far as I dare and then remove stock from the opposite side. I always work in the direction of the grain. By going back and forth from one end to the other I can remove large amounts of waste in a short period of time.
By angling the cutting edge of the gouge one way or the other you can begin to shape the walls of the spoon bowl. The straight cuts work best for roughing out and for the bottom of the spoon. Below I am cocking the gouge to one side to make the near wall of the spoon bowl.
Here you need to exercise care not to take such big cuts as will cause splitting because you are now working on a thin rim of the spoon with less margin for error. You will find that some species of wood will split far more easily than others.
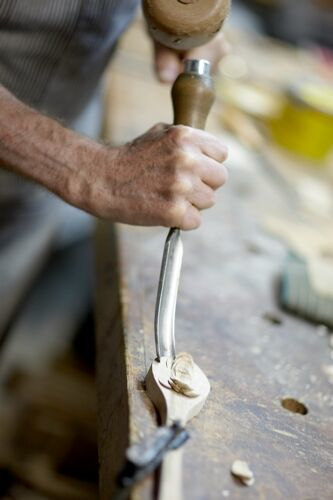
You can only get so much control of the cutting edge of the gouge when you are pounding on it with a heavy carver’s mallet. So for finer cuts I just use muscle power without the mallet striking the gouge as seen in the picture below. Notice I use a glove on the hand that guides the cutting edge.
Considerable force is needed to make even these lighter cuts and if the hand slips it may hit sharp corners of the band sawn edge of the blank and cause cuts. Using a glove in the hand that does not grip the gouge handle cuts down on the need for band aids and loud exclamations.
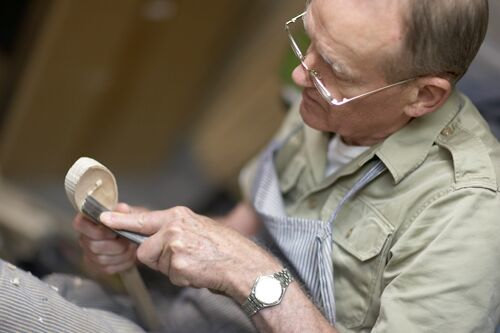
For the finest cuts I remove the blank from the clamp on the bench, sit comfortably and use the gouge free-hand as you see me doing below. This gives maximum control and allows clean up of any rough areas left from previous steps.

In my earlier spoon making days I used to carve the outside of the bowl of the spoon and the handle all by hand. I used a combination of gouges, draw knives and small pattern maker spoke shaves to remove the waste. However this is a slow process.
Now I use a large belt sander with an aggressive planer belt from Klingspor. With a bit of practice you can smooth the contours and remove all the bandsaw blade saw marks. You can even round out the handle.
Sanding and Oiling the Spoons
What remains is to hand sand the spoon. I do not go above 220 grit as these spoons are for cooking and finer finishes are not important. I oil my spoons with sesame oil. I used to use mineral oil but since this is a petroleum based product and not renewable, I feel more comfortable using a vegetable oil.
I choose sesame oil as it has the longest shelf life of all the non-drying oils and does not become rancid easily. This is due to unique antioxidants found in sesame oil and not in other vegetable oils.
I don’t recommend olive oil as it spoils very quickly and you get a tacky residue building up on the utensil. A food safe drying oil such as tung oil can also be used.
Care of the finished product is very easy. Just wash in soapy water and let it air dry. Over the course of time the surface may become whitened due to fragmentation of the fibers with repeated use and washings. Just apply another coat of sesame oil and the finish is restored.
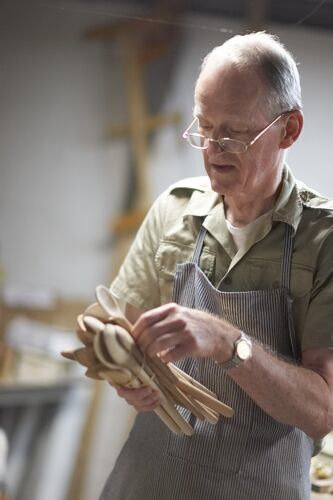
For heavily used spoons a light sanding before reapplication of the oil is all that is needed. A well cared for spoon can last for generations. Below is a picture of spoons ready for oiling.
Other Methods of Wooden Spoonmaking
I would just like to say a few words about other methods of making spoons. If you only want to make one or a few, then you may enjoy carving them completely by hand. This allows for great individual expression.
There are even special tools for hollowing out the bowl such as curved bladed carving knives or special spoke shave like tools with a curved blade. Just bear in mind that the curve of the spoke shave tool will limit the radius of the bowl of the spoon.
More recently I have used special carbide cutting burrs with a flexible shaft tool. There are burrs which are suited to hollowing the bowl of the spoon. There is a bit of a learning curve to this. It requires a firm hand and practice to know how aggressively to make the cuts or you will find that the bit wanders and wipes out the rim of the spoon you are trying to make.
It is easier with one of these tools to make a deeper bowl in a spoon than you can with spoon bent gouges. After using the burrs I clean up the tool marks with the hand held spoon bent gouge using light finishing cuts. So for certain shapes I have actually come to prefer this method of hollowing.
Some spoon makers turn a blank on the lathe. This gives a very symmetrical round handle and outside of the bowl of the spoon. Then they may use a saw to remove waste from the spoon bowl and use some hollowing process to carve the inside of the spoon bowl.
Some even mount this on the lathe and turn it out. Be advised that what you have is a spinning propeller and take care to keep fingers away from the spinning handle which you cannot completely see.
So, I have not tried to provide a comprehensive treatise on spoon carving but rather to share with you what works for me with an eye towards making useful and practical cooking spoons in sufficient quantity to meet the needs of my crafting.
I find that it is a good means of using up odds and ends of wood from the shop. After more demanding tasks I find it very relaxing to work up a few spoons and allow for my creativity to express itself in this simple way.
Wooden spoons make wonderful gifts. People especially love when the wood is from a tree or a limb that they gave you. With a bandsaw, any limb wood can produce good spoon blanks. It provides them with a connection to the nature that they had known and come to love. The tree may be gone but the memory of it survives in the spoon and that can be passed down from generation to generation.
what do i need to coat my handmade spoon so i can cook with it thanks
Dear Mari Anderson:
I prefer to coat my spoons with sesame oil, the light kind, not the dark toasted oil used in Chinese cooking.
I have several reasons for this preference. First, it is not a petroleum product like mineral oil. Second, it is a
non-drying oil and can be reapplied when ever necessary to keep the utensil looking attractive. Third, sesame oil
does not get rancid quickly like olive or other oils. It has the longest shelf life of any commercial vegetable oil.
Using this for the past 25 years has proven very satisfactory for me. We use wooden implements every meal and the spoons and spatulas get lots of use and lots of washings. A little oil on them from time to time keeps them looking almost new.
You wrote: ” and use some hollowing process to carve the inside of the spoon bowl. ” OK, could you tell me what is the “some hollowing process” ? What is the name of the tool? How to do it fast in many spoons. Do I need CNC machine/router?
Andre Krol
Dear Andre:
I did not elaborate on that part of the article as I do not make my spoons that way. It sounds like you
plan high volume production and I think there are others who might give you better guidance on that
question. There are probably as many methods as there are production spoon turners.
Edwards Smith
Hello Edwards,
I found your website really informative; now I have a better idea of how wooden spoons are made. My daughter and I own a shop called The One Stop Sustainability Shop. If you have a chance, please look at our website to see what we’re about. A number of customers have come into our shop asking for wooden cooking utensils. I scoured the internet trying to find somewhere that sold wooden spoons, etc. wholesale.Most wooden spoons are made in China. Found one place, but they are very expensive. After looking at your website I can see why – it obviously takes a while to make a spoon and to become competent enough to make a spoon.
My husband and I do woodworking, so I thought, well, maybe I could make the spoons to sell myself. It would obviously take me a while to get competent at it, however, it’s something I would like to try, especially since I want to make presents for my family this Christmas. Mostly I’ve made tables and dovetail boxes, but I am basically a novice woodworker. My husband, on the other hand, is very good.
Do you have any spoons you would like to sell wholesale or even half-made spoons that I could do the finishing on? Our shop is new and small so we don’t have a huge customer base and I don’t know how many we would sell. It would be nice to have a few spoons in stock in case someone wanted to buy one.
Thanks again for sharing your knowledge. Take care.
Sincerely,
Barbara McLean
Dear Barbara:
Thank you for your nice comments. It is always nice to have feed back on what you have written. My joy is going from the tree to putting the finished product in the hands of the person who is going to use what I have made.
Most people in the crafts field will tell you that there is not much of a living to be made in utilitarian products such as treen ware. Most customers have been conditioned to box store prices made possible by cheap and cheaply made imports, so the motivation to do wholesale work is not so appealing.
I made a how-to DVD that demonstrates how to use a grinder and a cutting wheel for hollowing the bowl. It may be simliar to the power cutting burr decribed above. It is a little tricky but the you can see on the DVD how to hold the grinder, anchor the spoon in the vice and how to move the wheel to make the bowl. If anyone is interseted in a DVD on how to make wooden spoons with power tools visit my website at:
http://www.makingwoodenspoons.com/
It can be ordered through Amazon.com
Dear Gavin:
Thanks for your information. There are as many ways to make a wooden spoon as there are wooden spoon makers.
Often a motorized tool makes the job much easier. As you point out, it may have a learning curve associated with it.
Hi Edwards,
I found your website and was fascinated and decided to give it a try. I have made about 30 spoons to date, and am getting better with each one. I have tried a variety of woods from maple, cherry, walnut, oak, mahogany and poplar. Each has unique characteristics, what do you recommend and what will hold up for the long haul. Also, I have been oiling with the sesame oil you recommend, but find that after a few uses and washings, they become “rougher” and much less finished looking. Is there something you can recommend that would seal the wood better, yet be safe for cooking?
THX!
Scott
Dear Scott:
Sounds like you are off to a great start. I have a suggestion. Your roughness after two or three washings may be due to the water raising the grain on your spoons. To get around this I will do my medium grit sanding and then immerse the spoon in plain water for just a few seconds. Then I put it out to dry overnight. This will raise the grain and it feels rough again . At that point I will do finish sanding with the two finer grits of sandpaper. Now the wood will feel silky smooth. Then I apply sesame oil. When this spoon is washed the grain will not be raised by the water and should remain smooth. Try this and let me know if it solves your problem.
My wife has a collection of spoons of various woods that have been in constant use for over three decades. All the woods seem to work well. Some of the best varieties I have found are cherry, maple, and beech. However the differences between spoons made from those woods and others you mention are not very great. In general, any fruit wood is an excellent choice. I just made some out of peach and the grain is quite attractive. Walnut is fine. I go more by what is available and what I think is attractive. You are creating hand made items and there is no need that they all look alike. Experiment and find what you like best. Variety is the spice of life.
Great, thanks Edwards, sounds like that will solve the problem. I’ll give it a try and let you know. Thanks again for introducing me to this amazing artisan hobby, I’m hooked!
Hi, thank you for your great website – I wonder what you would recommend as a starter bent gouge in terms of width and sweep for spoon making? cheers
Dear James:
Thanks for visiting and your question. I use a # 8 sweep, bent gouge between 25 and 30 mm wide.
I find this is a happy medium. Shallower sweep and the corner digs in the curve. Deeper sweep just
cuts deep furrows. Yet it is a matter of personal preference.
Happy spoon making. The ladies like them.
Edwards, thank you so much for the wonderful article and photos of how you make your spoons! It sounds like such an intriguing craft to try out. I am going to share your post with my husband who is the woodworker in the family. Perhaps this might be a fun craft for us to learn to do together! Thank you for sharing your advice and experience.
Dear Tina:
Thanks for your kind words. It is really wonderful to be able to share knowledge on the internet and
reach so many people. Spoon making is great because the material is everywhere. Any tree limb
will work and it can be done with simple tools. The many steps can be shared as you suggest. Some
take more muscle and others take more patience. Jack Sprat could eat no fat and his wife could eat no lean.
Edwards
Enjoyed looking at your site. Do you use green or dry wood? If green, how do you dry the wood. Makes me want to make a spoon.
Dear Ron:
I prefer to dry my wood for spoon making so I can see where the checks are but sometimes I don’t dry it very long.
In other words it does not have to be bone dry. When you use wood from tree branches there tends to be
checking near the pith of the tree. When the wood is dry you can see those checks. It is disappointing to carve a spoon in wet wood and then see it check as it dries. It is best to keep away from the center of the limb or log as this is the wood that checks the most.
I love to use fruit woods such as cherry, peach, plum, apple, apricot, etc. Often the pieces you have to work with are not very large and so you don’t get big planks to use. To dry the wood I re-saw the limb or log on the band saw so that it is about 3/4 of an inch thick. If you don’t have a band saw, then you could rive them with a froe or an axe or hatchet. I take the small planks I get from this process and sticker them. That means I put two scrap pieces of wood on a surface such as a table or the floor and then stack the small planks so that each end rests on the scrap pieces or “stickers.” If I have lots, then I lay down two more scrap pieces on top of the planks and make another row. This allows air to freely circulate over both surfaces of the plank and make for more uniform drying and less warping. I find that it only takes a few weeks for the wood to be dry enough for my purposes. It takes so little wood for a spoon that you can easily find wood right around where you live or even in your own yard.
Sincerely yours,
Edwards Smith
mr. smith i would love to order spoons from you. please how may i do so? aj
Dear AJ:
I have spoons in stock or can make them up in a wood you prefer. My spoons are $20 and are signed, dated and the wood from which they are made is specified. The size may vary and you can specify your preference. The small spatulas (see them in the website in the Treenware section) are $12, medium $13 and large $14. There is a minimum order of $40. Add 10% for shipping and handling. I accept payment by personal check only. When your check clears I will ship you the spoons, etc.
Sincerely yours,
Edwards Smith
Hi edward my name is sandra I live in alabama I have developed a love for wooden spoons and I don’t like the ones from the store. A lady I clean for has some beautiful spoons of all different shapes that her father n law made I was very interested in purchasing some but when I spoke with her she said he had passed away a few years ago I got online and typed in how to make wooden spoons and got here so do you have a catalog of your different style of spoons and their prices I would love to see them. Thanks sandra
Dear Sandra:
Thanks so much for visiting my site and your inquiry. When my son was four he told his Montessori teacher that his father could make anything. As a result of that comment I got to make everything for the Montessori School for several years.
So, I can make you any kind of spoon you want. My small spoons are $18 and the large ones are $20. Special woods like olive I add two dollars to the price. My minimum order is $30 and shipping is extra but close to what it costs me. Spoons are pretty light and the shipping is not terribly expensive yet.
Since I like to think I am all possibilities, you need to give me some preference for shapes and wood species. Anything that is like the ones pictured on the site would be for the prices mentioned above. If it is more elaborate or larger in size I would charge proportionately.
My spoons are not for looking but for use. This is why my spoon design has evolved the way you see on my web page. I don’t like skinny handles that will break. I don’t like very deep spoon bowls because the edges chip. I can make them any way you want but I prefer to make one that will give many many decades of service and perhaps be passed on to the next generation.
My summer is taken up with travel and the first time I will have to put attention on any special order will be September. However, I enjoy making exactly what someone really wants. Please let me know how I can help you.
Sincerely,
Edwards Smith
Hey mate, I am an apprentice patternmaker from Melbourne, Australia and since joining the trade have found a love for wood turning and carving in my own time, I basically try to find things to do with all the tools I have recieved/found over the last four years. I picked out some timbers lastnight and will start making a set of spoons soon. I look forward to putting your experience to use thanks for all the information, wish me luck, i may try the turning method you mentioned one day also, with the handle spinning everywhere,
Cheers
Jon
Dear Jon:
Thanks for sharing your experiences. Pattern making used to be a very important trade in the earlier days of the industrial revolution. It required great skill and precision. Models were made in wood and then used to make sand molds for receiving molten metal for gears and every sort of thing. One of my favorite sets of tools is a set of three pattern maker’s spoke shaves of brass, each with a different kind of sole. I used them for years in my wooden spoons.
It is really nice to have your feedback. I write these blogs to share what I know and when it inspires others, it makes me feel good. I am very thankful for the internet which allows me to share information with people all over the globe.
Sincerely
Edwards Smith
Dear Edwards-
I love the photos of you working – beautifully done.
If your readers would like to see the A Gathering of Spoons catalog, it can be viewed as a PDF on the American Association of Woodturners Gallery of Wood Art site: http://galleryofwoodart.org/pastexhibits.html
Norman is currently working on a expanded book of his work and there will be an exhibit of his collection in Connecticut this autumn. His collection has grown tremendously, and his careful documentation and dedication to the art is a great gift to the field.
Dear Tib Shaw:
Thanks for your comments. My son did the photography. He is skilled in photojournalism (www.toddsmithphotography.com. He patiently shoots as I work.
I think that Norman Stevens has made a great contribution in documenting spoon making. One of my spoons is in his collection. It turns out that this blog entry on spoon making has been my most popular one. I think people can relate to it as it is something anyone can do.
i have leand alot in 2years other people at work from the crafter im 29yrs old and enjoy making spoons. do you have any tip for me
Oil — I’ve heard that walnut oil does not go rancid and is food safe. Have you tried walnut oil? I use mineral oil, but have not tried walnut oil on kitchen cutting boards. I’m interested in making spatulas, possibly some spoons.
Thanks for sharing.
Dear John:
Actually all oils polymerize eventually and become hard. However, the reaction is fast in the drying oils (a matter of days or weeks) and is very slow in the non-drying oils (years to decades or even longer).
The drying oils I know are linseed oil, tung oil and walnut oil. All are natural products made by plants. Drying oils polymerize and become hard and dry rather quickly. None of them will become rancid. Linseed oil, because of its variable drying time usually has other chemicals added to make it dry reliably. Watco Danish oil is such a linseed oil based product. Others may have solvents added to them to make them penetrate better. My understanding is that all of these oils when dry (when the solvents have evaporated completely) are food safe. Of the three drying oils, tung oil may have the most resistance to solvents like water and alcohol. I use tung oil for my treen ware if I use a drying oil. You can buy walnut oil, tung oil and linseed oil which are sold as being food safe.
There are many non-drying oils. Mineral oil is one you mentioned. Most of the other vegetable oils are non-drying. I used to use mineral oil but stopped because it is a petroleum product and is non-renewable. Of the non-drying oils for treen ware, sesame oil is my favorite. It has the longest shelf life of all the vegetable oils and thus does not get rancid.
So, it is a matter of choice. Drying oils and non-drying oils can be renewed when the surface begins to whiten with repeated use and washings. I have used both with good success. As I sell treen ware at shows I have come to prefer a drying oil as it does not bleed on to table cloths and storage boxes. Right now tung oil is my favorite but that could change. I have not used walnut oil. Let me know how you like it.
Sincerely,
Edwards Smith
I came across your site when I googled Norman Stevens, spoon collector (I also made one for his collection back in 2005) I also make wooden utensils. My site is not up at the present time because I have moved and am settling in.
I enjoyed reading the process you use in making your wooden ware. Please contact me at: osagemann@yahoo.com I have been making wooden utensils since 2002 and have found solutions to many problems that spoon makers have. My utensils never get fuzzy (no matter how long they soak in water) I can share this with you when you write. Looking forward to talking. John
Mr. Smith
If you would please tell me where you purchase your gouges and what brand please. How do you sharpen them? Do you use a stationary grinder? Thank you for sharing your knowledge.
Cody from AZ
Hi Mr. Edwards I just want to say thank you for sharing your story I really enjoyed reading it. Makes me wish I could come by and visit with you for a while and just listen and learn. I have been wanting to get into woodworking for a long time. I don’t have a shop right now so I believe for me it might be a good idea to start like you did, with a spoon. I have made a few spatula’s before and enjoyed that. I have been looking for a gouge but can’t seem to find any. Can you point in the direction of a place I can buy one? Is there anything else you could recomend someone to make that wants to get started in woodworking? Thanks A lot
Hello Mr. Smith
First off, your photos are beautiful!!
I have made and sold some spoons online and very much enjoy making them. My process has been to use a side grinder with a wood cutting wheel installed to hog out the spoon bowl. While this method is very fast for wood removal, it makes a huge mess in my small shop throwing wood chips and lots of dust everywhere including me! I’m looking for a cleaner way to do this job.
I want to get away from this method and try the low-tech way of using a gouge or gouges to chip out the spoon bowls. Could you please tell where you found the firmer gouges you use for your spoon bowls? I really like the look and shape of your bent gouges but can not find these particular ones online anywhere. I like good, quality made products that will last so your input would be much appreciated.
Also, can you say if firmer gouges can be sharpened on a bench grinder or not? I am also a woodturner so I have a slow-speed grinder to sharpen my woodturning tools but wonder if it could work with firmer gouges to re-sharpen them?
One last question. You mentioned wood grain direction. Of lately, I have been trying to use a draw knife and spokeshave on spoons and spatulas to rive down the handles, curves and back of spoons etc, but find it’s not easy with these tools. It seens wood grain direction changes (or even reverses) in some wood board blanks making using these hand tools a nightmare for me at times. Do you have any suggestions on how to best handle grain direction changes in woods?
Thank you sir,
David
Dear David:
Thank you for visiting my site and for your kind words. I cannot take credit for the photographs. They were done by my son Todd at:todd@toddsmithphotography.com. He is a professional photographer who is very good at photojournalism.
There are lots of ways to make a spoon. Doing the inside of the bowl of the spoon is the biggest challenge. Actually the thinner gouges work fine. I had several but when I would demonstrate at show people kept stealing them when I was not watching. I would get them from places like Woodcraft Supply or Woodcarvers Supply. There are many other sources. I started using the firmer gouge as it was the only one I had left. It came from Woodcraft Supply but was only available for a short time back in the late 1970s.
What I have learned over the years is if you see a tool you like, don’t delay in ordering it. The market for these kinds of tools is not huge. Production runs are limited and the market is easily saturated. So when the run is exhausted there may not be another. I have kicked myself many times for not buying a tool I wanted only to find later that it was not available anywhere.
In regards to firmer chisels I suggest you do an internet search for them. When it comes to sharpening the only time I use the bench grinder is to remove the roundness of the bevel after sharpening by hand too many times. The bench grinder takes off too much steel and shortens the life of your tool. I use Japanese water stones. I find they sharpen quickly and produce a very fine edge. An edge which will shave hair from the back of your hand is a proper edge. The effort needed to move a sharp tool through wood is remarkably less than for a dull one. You need a medium and a fine grit. To make it handier to sharpen I will keep my stones in water all the time in plastic containers. I just turn the top of the container over to hold the stone and all the drips as I sharpen my tools. When finished, the stones go right back into the water. This way there is no delay for the stone to absorb
water and the wet mess is contained in the shop where moisture may cause rust to valuable steel tools.
The only solution to changing grain direction is close attention. Every little growth pattern change in growing wood will change the grain direction at that point. I always avoid using wood that is close to the heart of the tree where the annual rings are very small in diameter. That wood is prone to checking and may already be checked when the tree or limb is cut. Most any piece of wood has a spoon or two in it. Limb wood works fine as well as scraps left over from other projects. If splitting is a problem, make smaller cuts and reverse the direction of the cut more frequently. Draw knives have the ability to remove much wood quickly but need to be very sharp for finer work.
I have also found that the wood does not have to be completely dry. Damp wood is softer than dry wood and may be a bit easier to work. I also don’t buy wood. If you have a chain saw wood is available everywhere. After a storm or when a tree dies, neighbors are more than happy to give you wood. You can rive blanks by hand from a small log. To save time and effort I resaw on a bandsaw. A fourteen inch band saw is big enough for that purpose.
In recent years I have been using a MasterCarver flexible shaft tool from Woodcarvers Supply. I use one of the semicircular carbide cutters available from the same source. I find I can go deeper into the bowl of the spoon without the danger of tear out. When you drive a gouge into wood using a mallet, the wood in front of the gouge splits ahead of the cut and you have to be very careful not to allow the split to get to the rim of the spoon. This means taking very small cuts and reversing the direction of your cut frequently.
With the grinder on the flexible shaft I don’t have that problem and can produce shapes of the spoon bowl which are harder to do with a gouge. As with every tool there is a learning curve associated with its use. It takes wrist control to keep it from skipping and marring the rim of the spoon bowl. It does produce a lot of dust and that is the trade off. I always wear a dust mask in the shop. Lung disease due to dust exposure is no joke. Then I take my spoon bent gouge and make light cuts to remove the teeth marks in the wood left by the grinding process. I use a small flap sander for some of the sanding and then hand sanding.
All in all there is something very satisfying about using hand tools. They are very portable and the edge produced by a sharp tool requires little sanding. Good luck with your spoon making activities. Every cook loves their favorite wooden spoon and many last for several generations.
Edwards Smith
Dear Mr. Smith,
Thank you for your love of wood and the thoughtful piece on spoon carving. I am new to woodworking and would like to carve a cooking spoon as a first project. I have a neighbor who can help me fashion the spoon blank and I’m eager to do the rest. What sort of carving tools, specifically, should I have to begin? What sort of wood do you recommend? You mentioned fruit trees, but I don’t have any of those. We live in a relatively wooded area with plenty of ash, beech, birch, maple, and holly. Would any of these be good to use? Lastly, how much bigger do you cut your blank than the intended spoon size?
Kind regards,
Misko
Dear Misko:
Thank you for visiting my site and your uplifting comments. Everything is easy once you know how. The more spoons you make the easier it gets. Almost any wood can be used. Large or medium limbs are fine. You can rive the wood to correct thickness with any sharp tool such as an axe or hatchet or the traditional tool, the froe. If you have access to a bandsaw, this is ideal for re-sawing and rough shaping of the spoon.
There are so many ways to carve the blank. You have seen me use a spoon bent gouge. They are available from many sources including Woodcraft Supply and Woodcarvers Supply. You use the size that suits you. Yet even a pocket knife will do very well for everything except the inside of the bowl of the spoon. There you need a curved cutting edge. Carbide cutting rasps in a drill or drill press will also work for hollowing. I often use such a tool in a small flexible shaft tool called the MasterCarver from Woodcarvers supply. The idea is just to start with what tools you have and feel free to improvise. Early woodworkers may have used a hot coal to hollow out the bowl.
I am not sure where you live but the woods available sound like typical eastern hardwood forests. I find that beech is a very nice wood for treen ware. It is clean looking and holds up well. Maple is fine as well. Ash is a bit more open grained but I have made many an implement from ash. It is very resistant to water degradation. In fact most any wood will work. Holly is so creamy white that it makes a most attractive spoon.
It may help to draw an outline in pencil on your blank and then just cut to that line from either side. This will tell you how much waste wood you need to leave. Do a few and it becomes obvious. Good luck with your spoon making. Soon you will be an expert. Just go ahead and start. Don’t be afraid of making a mistake. The wood is everywhere available and most of it is free. Your mistakes make good kindling for the fire.
Sincerely,
Edwards Smith
Thanks for the good reading. I thought it would be neat to make some large spoons for stirring up big coolers. I also thought it would be fun to make the head of the spoon a different wood than the handle. Any ideas on how I would brace the two pieces together? Or should I just move on and make them out of solid pieces?
Hi edward,
Found your site and enjoyed reading about the way you make wooden ware. Even though my website is something totally different than spoons, I have been making 35 different variety of wooden ware for 10 years now. Thus my email address osagemann @ yahoo. I make all the utensils I sell out of Osage Orange…I feel osage makes the most durable spoon, I didn’t say the best. There are lots of woods that make great wooden-ware, but I believe osage will last the longest.
I would enjoy talking to you if you ever have the time. My email address is osagemann@yahoo.com Just put wooden spoon in the subject line. Looking forward to talking, John
Mr Smith;
I loved the article, and the photos were fantastic.
Just a quick question, is using cut off from lumber factory cut and sold at your big box DIY stores like Home Depot and Lowe’s ok?
I have concern that though the lumber is not marked “Treated” or sold as Pressure Treated that the factories still treat the wood with a chemical to slow molding in the event the wood is stored in a moist environment.
I also wonder if the lumber isn’t treated to improve curb appeal.
I have made several spoons as gifts over the years, often times not even bothering to identify the types of wood after I pulled it from the scrap been at a lumber yard or DIY center. And I wonder if I have potently placed friends at risk, no matter how low that risk could be.
Could you please touch on this a bit? Can I purchase Poplar at my local store without concern?
Thank you in advance!!
Dear Edwards
Firstly I have found your website so interesting – your generous notes on the method are so good to read.
My husband (in Australia) has been making spoons for our friends for Christmas – they are beautiful, made from an Australian Gum called Rose Gum – he had some left pieces of timber over from another project he was working on. I noticed that your spoons are signed and dated. I would love my husband to put his name on his spoons as that would make the gift more personal. Can you suggest a way that he can do this in a simple way.
Thank you
And have a Merry Christmas – I will look forward to hearing from you.
Jennifer
Dear Jennifer:
Thanks for your note. I have found the best way to sign a spoon is to use an engraving tool. This is a simple tool that vibrates a hard steel point. Mine is made by Dremel and came from Craft Supplies in Colorado in the US (www.woodturnerscatalogue.com) and costs $29.95 in US currency. I am sure you can find something similar in Australia.
Since the point on the engraver is very fine it allows you to write in small letters which I put on the back of the handle of the spoon. You have to look closely to see it and so does not detract from the overall appearance of the wood. I find that wood burner tips write too large for signing spoon handles. I use the wood burner tip for larger projects.
I feel that it is important to sign your work. It creates an historical record and may make the piece more important to the owner. I have some wooden implements which belonged to my grandmother. I would have loved to know who made them.
Mr. Smith,
I would like to congratulate you for the amazing website. I found here people that love wood and wooden spoons, just like me. In my country, Brazil, I use demolition wood in my projects as a recycling method.
Merry Christmas for you, your family and friends.
Best regards.
Marcelo Freitas – Brazil.
I am put in mind of the wooden shoe carvers here in Holland Michigan, not to mention in the Netherlands. It’s a bit more extreme that carving a spoon, but a hollow is a hollow is a hollow, to fracture a paraphrase of once beautiful poetry. And speaking of beautiful poetry, your work, and this website, are very beautiful poetry.
Regards, and many thanks,
FH
Dear FH
It was very kind of you to write with such kind words. My feeling is that the every day tools we use should uplift the soul and nature provides the perfect medium for this task. Wood is both functional and esthetically pleasing at the same time. I never grow tired of working with it, whether making a simple spoon or spatula or turning a burl hollow form. Wood just strikes a responsive chord in us. I suspect that is because it represents Nature which is what we are in our inner being. When we recognize nature in ourselves, it gives us deep pleasure.
I am most grateful for the internet as a means to share my simple creations and observations with so many people that I otherwise would never have the chance to meet. We are all connected on a very deep level but it is not so often that the connection is recognized and acknowledged.
Sincerely,
Edwards Smith
Dear Mr. Smith,
I would like to congratulate you for the amazing website. Thanks for the insight that there are more ways to produce spoons. I mainly work with branches cut freshly out of a tree (storm damage/fresh cut tree’s). But always my options are limited, due to the nature of the branch I have in hand. My spoons are curved or bend the way the branch is bend. (example: http://pictures.mjvanderwielen.com/#6)
Second thanks for the tip of signing them. Never had the idea of preserving an historical record in my work.
Best regards.
Maarten
Dear Martin:
Thank you for your kind comments. I looked at your work and it is very artistic. Isn’t is nice to be able to take what others consider trash and turn it into something artistic and functional? We all stand on the shoulders of those who have gone before so sharing what I have learned is my way of repaying for the knowledge I have gotten.
Sincerely,
Edwards Smith
One more thing to say is that an online business administration training is designed for people to be able to effortlessly proceed to bachelors degree courses. The 90 credit diploma meets the lower bachelor education requirements and once you earn the associate of arts in BA online, you’ll have access to the latest technologies within this field. Several reasons why students would like to get their associate degree in business is because they are interested in this area and want to get the general knowledge necessary just before jumping right into a bachelor diploma program. Thanks for the tips you actually provide as part of your blog.
Edward,
I have been laminating several types of wood to make decorative spoons and other utencils. they problem i’m having is every time i wash them the grain raises, even after i sand them and oil them. Any suggestions on how to eliminate the raising of the grain?
Thanks,
Dan Taylor
Dear Dan:
It is a problem. You have the utensil all smooth and feeling nice to the touch and as soon as you wash it it has become all rough. The way I deal with this is after I have sanded to 180 grit I immerse the utensil in water and let it dry slowly. This will raise the grain. Then when it is dry I start with 180 grit and go to whatever is my final grit and then apply a finish. I currently use tung oil.
Then when you wash you utensil, the grain will already be raised and sanded smooth and so it will raise much less this time. Over time the use of it in your hand will give it a very soft and smooth finish. When you laminate dissimilar woods, some may raise the grain wet more than other wood species so the piece is uneven in smoothness. If this is the case you may want to wet it a second time and repeat the sanding.
Sincerely,
Edwards Smith
I would be interested in finding out more about what you are wanting to do. If you would like to contact me, you can email me at, osagemann at yahoo.com
Dear Russ:
Thanks for your note and information. The means of expression are infinite. Thanks for sharing yours.
Edwards