≡ Menu

Invasive and Unwanted Wood Species

I was doing a show in Maryland and a woman looked at a bowl and exclaimed:  “That’s Norway maple isn’t it?  Well at least it is a dead one!”

She worked for the government in an agency that combatted invasive species.  In spite of all the hype I have never known an invasive species that took over the whole world, except for mankind, I guess.

My own feeling is to make the problem the solution.  If you can make something beautiful or at least useful from an invasive or unwanted species then then next thing you know it will make it to the endangered species list and another government agency will be getting involved.

A few months ago a woman brought me the biggest buckthorn log I have ever seen.  Buckthorn is an invasive species here in Vermont and elsewhere.  It is a low scrubby bush with bad thorns and it spreads easily.  You will find it in overgrown meadows.  It is not a climax tree and gets shaded out by the taller climax growth hardwood trees.  The wood is very hard and tends to have twisted grain which checks easily.  However, like any dense wood it turns well. Here are some of the items I made this woman from the chunk of buckthorn she brought me.

buckthorn wooden bowls buckthorn wooden spoons

To my eye the wood has a lovely orangish tan color.  I was trying to tell my son who had never seen it what it was like. I told him that it looked exactly like buckthorn.  Don’t know any other wood that looks like it.

buckthorn wooden spoons close up

A close up reveals the interesting color variations of the grain.  You can make out a little curly pattern on the spoons. Who would have guessed you could make anything useful out of buckthorn?  I once heard a definition of a weed being a beneficial plant the use for which has yet to be discovered.

This same woman, who had been doing some land clearing, also brought me what I would describe as a cedar fence post. Where I come from in Virginia we call it common red cedar.  Actually, it is Juniper virginianis, a juniper and not a true cedar like we have here in New England.  It was about five feet long and no more than six inches in diameter.  It surface was deeply corrugated.  She wanted something made out of that!  Here is what came out:

red cedar wooden cups

Frankly, I was surprised at the interesting patterns which appeared with spindle turning this aromatic wood.  A man from New Zealand spent a day in my shop recently and I let him turn a piece of this wood.  He was delighted as no wood of that color grows in New Zealand.

Going back to that invasive Norway maple here are some things that came from that “dangerous” species.  These were ornamental trees planted in people’s yards that died or had to be cut down for some reason.

Norway maple hollow form spalted norway maple hollow form norway maple bowl norway maple bowl

norway maple bowl

So, for my money, everything has a use.  Don’t overlook the unwanted and invasive species.  I’ll take all the Norway maple and large buckthorn I can get.

{ 1 comment }

What Can I Do With That Wood? Part 2

Developing skill with a chain saw and having a large bandsaw at my disposal has allowed me to make use of a wide variety of woods. Commercial lumbering favors wood that can be sawn into boards and that has qualities favored by carpenters and cabinet makers for construction. For this reason there are many non-commercial species in the US which are overlooked by the commercial interests. Many, I think, are just as spectacular or quietly beautiful as any imported exotic wood species.

In a sense I am a wood recycler. Trees are always falling in storms, dying of old age, or having to be removed because of proximity to a house, pool, etc. The wood then becomes a liability to the home or farm owner (unless they have a hobby like mine).

One of the most unwanted tree here in Vermont where I am living is the box elder. It is a poor cousin to the sugar maple. Yet unlike its cousin its wood is not hard, does not make good fire wood and it grows like a weed, especially in wet areas. In short it is considered a trash tree.

Yet it take a good finish and it has one interesting feature. When injured the wood produces a pink or red color which contrasts sharply with the creamy white wood of the rest of the tree. My research suggest that this pigment is a non-specific reaction to injury. You see it where a branch has broken off or where there was disease in the center of the trunk.

The color varies from light pink to scarlet red. Unfortunately the color is not fast and fades into a light brown over time. No one knows how to prevent this color fading. Yet while it lasts, it can be very attractive. It is the nature of all wood to fade or darken with the passage of time. You may have noticed that furniture under a sunny window changes color.

If you have ever seen a 17th century antique you will note that it is black. Wood as it deteriorates reverts to elemental carbon which is black. You may have noticed that you have faded a bit with advancing years yourself. So don’t be too hard on the box elder because the color is not permanent. If the design of the object made from it is good then it will be enjoyable in spite of the changes just as you consider yourself to still have value in spite of the changes in your physiology induced by aging.

red box elder hollow form

This is a box elder that is about as red as I have ever seen. It almost shouts at you. It was from a tree that fell over in a storm in the town of Williston, Vermont where I live. It was kindly given to me by the owner who was happy for me to remove some of the wood on his lawn. I, in turn, was very happy to get this unique log and was happy to share a hollow turning from this log to the donor of the wood.

box elder wooden hollow form

This is a hollow vessel from the same log. You can see that some of the color has changed into a lovely light brown with differing intensities. So I feel that Nature has hidden some great beauty in a lowly short lived brittle tree of relatively soft wood which grows like a weed.

Butternut is another of my favorite woods to turn. It takes patience as the wood is softer than its cousin black walnut and tends to leave a fuzzy surface. It takes extra sanding to produce a good surface but the extra work may be well worth it.

butternut hollow form

Notice how the soft curves of the grain are reflected in the soft contours of the bowl. Notice how the soft shades of brown of the heart wood blend into each other. This is the subtle beauty of Nature at its finest, in my opinion.

butternut hollow form

Yet we are losing our butternut stands to a fungal disease known as butternut canker. This hollow vessel shows two black streaks where the fungus has invaded the tree. In time it will kill the entire tree. This tree had died and was given to me by the homeowner.

Even in disease we can see beauty in Nature. Those black defects can be considered artistic accents to an otherwise plain design.

Butternut Vase

Here is another example of the softness of colors in the butternut. The creamy sapwood blends gradually into the soft warm browns and tans of the heartwood. The simplicity of the design does not detract from the subtle color variations created by Nature. In my opinion, Nature is the real artist and my job is to show the beauty nature has already created.

{ 2 comments }

Shop Safety Tips For Woodturners

Over the years you come on tidbits of information that become a part of your routine. Woodturning is a hazardous hobby or profession. When I attend my woodturning club meetings I am constantly seeing members who have managed to injure themselves. If you have tried to get insurance to cover your woodturning activities you know that the insurers realize that injury is common and they may be severe and the insurance premiums reflect that. So here are some pointers to file away in your mind.

Most would agree that it is not good to be between a rock and a hard place. A tool rest does not have much give to it. When a finger is caught between a spinning block of wood or a four jawed chuck and the tool rest it is a formula for pain at the least and a disaster at worst. So learn to rotate your work piece by hand before you turn the power on and keep fingers clear of the gap between the tool rest and the spinning wood.

One of the conditions which can encourage such a mishap is an ornery banjo. The banjo slides on steel ways. Into it is fitted the tool rest post. There is little tolerance between the banjo and the lathe bed (or ways) when the lock released. So just a small amount of dust or wood chips can cause it to seize as you try to slide it up or back. So you wiggle on the lock down handle and push with the other hand. Often it will stick and then when heft is applied it suddenly gives way and slides into the moving work with unpleasant repercussions.

We all know that we are supposed to turn the lathe off when we adjust the banjo holding the tool rest. Yet I doubt there are one in a hundred turners who regularly do this. The reason is that time is money. It takes extra time to do this step.

What may help is to make sure that the banjo slides easily on the ways of the lathe. It is steel on steel and friction is a problem, especially when dust or chips are on the ways to reduce the clearance. It is not original with me but I read somewhere that if you take an ordinary piece of wax paper and rub the ways frequently, it makes the banjo slide easily.

The first time I tried it I was surprised at how well it worked. The wax leaves no sticky residue. It just reduces friction by transferring a minute amount of wax to the steel surface of the ways. Now I keep all my used wax paper sandwich wrappers just for this purpose. I had tried grease but that just attracts dust and chips. Spray on silicone did not seem to last very long. The wax paper was just the ticket for me.

Just bear in mind that the banjo may slide so easily that it flies further than you intended and can run into the spinning headstock if you are one of those who refuses to turn the lathe off when adjusting the banjo. Whatever, wax paper really makes the banjo slide on the ways. It has to be repeated frequently but will reduce the cussing you do when it sticks and it saves time and is much safer.

Another point I want to make is that a sharp piece of spinning wood will cut you just like a scalpel. Someone in our club recently cut a tendon on a finger. This is no trivial injury. So I make it an absolute rule to sand off any sharp spinning edge of wood that I have created, with my gouge preferably before I cut myself. When I ignore this rule I get blood on my lathe and tools. So, really, sand that sharp edge down as soon as you create it.

As a physician who has taken care of patients with chronic lung disease I know the dangers of breathing particulates. Thus I have made it my rule to don a dust mask as soon as I enter my shop and don’t remove it until I leave. It makes conversation difficult but I don’t do a lot of talking in my shop for that reason. Enough dust will make anyone wheeze. It is a signal from nature that something is wrong that you need to correct. I want to be turning for a long time and breathing easily for a long time as well. Prevention is better than cure.

{ 1 comment }

Scraping and Simplicity

Sometimes solutions are so simple you wonder how you ever overlooked them. I make a lot of bowls. My gouge technique is not so perfect as to leave an interior free from ridges so I frequently use a scraper. Both the interior and exterior of bowls have given me a problem with end grain tear out. The gouge or the scraper just makes ragged tears in the end grain and the more I scraped the worse they would become.

I had read of some solutions. One was to put oil on the problem area and then scrape. Some say that water will also work. This softens the fibers and make them easier to finish cut. I have tried these with modest success but in reality they are very messy.

Another suggestion was to make feather light cuts. That is easy to do when cutting with the grain but when you get to the end grain the gouge or scraper just seems to want to dig in and make the problem worse.

To sand out these areas of end grain tear out is laborious and time consuming. The dust it generates is just no fun. After years of turning bowls I seemed to be no further along.

I belong to a local woodturning club here in Vermont. It is the Woodchuck Turners of Northern Vermont. One of the functions of a woodturning club is to bring in demonstrators who have gained proficiency in some area of the craft. Our most recent meeting was host to Rich Detrano (www.richdetranowoodturner.com, e-mail: richdetranowoodturner@live.com) Rich does lovely hollow turned pieces.

Rich was demonstrating how he does hollow turning for people in the club who wanted to learn the skill. What I learned from Rich was so simple but it hit me like a ton of bricks. He said the solution to most problems on the lathe can be solved by slowing or raising the speed of the lathe or by raising or lowering the tool rest or by moving the tool rest closer to the work or further away from the work.

Now that is pretty simple and straightforward. I had learned that to scrape properly, your tool cuts better when it is presented to the wood somewhat above the center of the axis of rotation. If it is below the center it will just rub and not cut at all.

I had also learned that if your tool was too far over the tool rest it tended to be hard to control and took a lot more work. So I had learned to move the rest closer to my work and enjoyed the results of this simple adjustment.

When turning I generally wanted to cut as quickly as possible. So I would push up the speed as much as I dared. Never, in my wildest dreams did it occur to me to slow the lathe when I scraped. When I did, scraping became a joy. Instead of vibrating over the end grain tear out it tended to cut right through the irregularities. The shaving were very fine and with repeated passes I found that I could eliminate the tear out better than I ever had before.

When you think about it, it makes perfect sense. The faster you drive your car over a depression, the higher it bounces. When it comes down, it comes down harder and tends to dig the next rut. This is how you end up with a “washboard road,” the kind of dirt roads I learned to drive on as a kid. Just like that when the scraper or gouge hits a rough spot of tear out at high speed it tends to bounce off the rest and then it comes down hard to dig into the next area of end grain. Thus the end grain tear out gets perpetuated and even made worse.

By slowing the lathe speed, and you can adjust what speed works best for you, the tool cuts evenly and does not vibrate and you have greater control.

How I could have overlooked something so simple all these years is beyond me. I don’t ever remember reading about this point although I may have and it didn’t register. So I am very grateful for Rich Detrano making this point so clearly and succinctly. To solve problems, slow the speed, raise the speed, lower the rest, raise the rest, move the rest closer or further away.

{ 0 comments }

Center Finding Device for Jam Chucking

As an avid turner I may turn a hundred bowls a year. Turning the bowl, either wet or dry is pretty straightforward. However, when you remove the finished bowl from the face plate or the four jawed chuck, remounting it to turn the foot is another matter.

The key thing here is to get the tail stock in the exact center of rotation when the bowl was reversed and you finished the outside and inside of it. Now you have removed the bowl from what was holding it and need to get it to spin on the exact same axis of rotation but with the bowl reversed so you can finish the base of the bowl and the foot, if any.

If you are not successful in this, when you try to blend the foot with the body of the bowl, there will be unevenness where the curve of the bowl meets the new curve of the foot or base. One side will be high and one side will be low. It won’t sand out easily either. So I would like to take you step by step through the method I have found works best for me.

First of all, I use jam chucks. I know about vacuum chucking but at this point in my career I just don’t want another piece of apparatus with a long learning curve attached. Jam chucks are so simple, easy to use and durable. Nothing to break or get out of adjustment.

Here is a selection of jam chucks I use. First I purchase inexpensive aluminum three inch face plates. To these I screw a piece of 3/4 inch plywood cut in a rough circle. I put this on the lathe and true up the circle with a gouge and then turn a curved bevel on the edge which will fit into the inner curvature of a bowl. I have several sizes to suit the size of the bowl being finished.

jam chucks

Here is the back side of the jam chuck showing the aluminum face plate which has been screwed to the plywood. These are much less expensive that the Oneway steel face plates I use for mounting bowl blanks to the lathe for initial turning. Since there is no great strain on the jam chuck it does not need to be so sturdy.

jam chuck back

This is how the jam chuck will fit into the inside of a bowl Ordinarily the inside and exterior of the bowl would be finished but I didn’t have one handy when I took these shots. So this bowl has yet to be finished but the principle is the same.

how jam chuck fits into bowl

Now we see the jam chuck mounted to the lathe and the bowl to have the foot finished being shoved by the tailstock against the jam chuck with a pieced of foam between to prevent marring of the a finished surface and to prevent slipping and heat scoring of the bowl interior.

So this is how a jam chuck works. You use the tail stock to press the outside of the bowl against the jam chuck which fits inot the interior of the bowl or object. It could be a box or a hollow turning just as easily. You turn off the excess wood of the tenon and then remove the last little plug with a saw or chisel and sand flush. If it is a dovetail base then you turn off the dovetail and blend the curve with the base of the bowl. In this case you may be left with a hole made by the tail stock center.
That, too, can be sanded off if you left enough wood in the center.

The important point is to get the center of the tail stock center into a spot which is the exact center of the axis of rotation of the bowl which was established when the bowl was turning the opposite way before it was removed from the face plate or four jawed chuck and reversed. I f you don’t find the exact center then the bowl will wobble and the gouge cuts on the foot will not blend with the curve on the upper part of the base.

dovetailed recess

Here we have a walnut bowl. Instead of having a tenon on the base which would be held in the chuck, it had a recess turned in the base. The chuck jaws have been lowered in the recess and then the jaws expanded into the dovetail recess cut in the base. Whether the bowl was held by a tenon or by a dovetailed recess the tenon has to be removed or the recess has to be blended into the base of the bowl to create a nice finish on the bottom of the bowl.

bottom of the bowl

Here is the base of the bowl and you can see the dovetail recess.

dovetailed recess

With more magnification you can see that the exact center of the recess is not apparent. To pick a spot would be just to guess. and with the slightest error you would get a wobble. I have seen very experienced woodturners use trial and error methods over and over and even resort to pounding on a vessel to try to get the tail stock center to get in the right spot. You do this enough times and you scar the area around the center and it becomes harder and harder to find the exact center.

cylinder

Here is a device that is simplicity itself. It makes quick and easy work of finding the exact center of rotation of the vessel in one step. It consists of a turned steel cylinder with a wide flange on top. This has been machined to fit exactly into the same hole in the four jaw chuck as the threads on the drive center of the lathe. I use Vicmark chucks and the fit is perfect. I also use a Nova chuck and the fit is a bit loose on that one. So to get around this I put a couple of turns of painters tape around the cylinder until it fits into the hole in the chuck snugly.

small steel round with point

The smaller black steel round is made to fit exactly into a hole milled into the larger steel cylinder. You can see from the picture above that this has a small point on the end.

inserting the cylinder into the chuck

Here the cylinder is about to be inserted in the base of the chuck.

cylinder is seated

Here it is fully seated with the inner rod with the point inserted in it. Since this bowl did not have a plug tenon turned on the base but rather a dovetail recess the pin drops below the level of the insert. No matter. If the pin is above the surface of the insert I just give it a knock with a wooden mallet. I use wood to keep the head of the pin from spreading which would happen if I repeatedly hit it with a steel hammer. You can see that if the head was spread then it would not seat properly when the striking surface was low as in this example.

using a drift pin to strike

Here I am using a drift pin to strike the pin which will leave the center mark on the bowl. This allows me to strike a blow even thought the pin is below the surface of the insert.

the wood is marked

Now the jaws of the chuck have been removed from the bowl bottom and you can see the dark shadow cast by the dimple made by striking the pin in the previous step above. Note that the exact center is not where you think it should have been using visual clues from the base of the bowl.

the wood is marked

In this picture I have mounted the bowl against the face plate which is attached to the drive center of the lathe headstock. I have deliberately pushed the tailstock against the bowl base to hold it for the picture but have not centered the point on the tail stock in the hole punched by the center finding apparatus. I wanted to show how clear the marking is for the center point. From this angle we get more shadow and contrast than with the picture where we were looking face down into the hole which was shown previously.

mounting tail stock

Here the tail stock has been firmly mounted into the exact center of the bowl.

jam chuck mounting

Once again here is the jam chuck with the bowl centered exactly on its axis of rotation. The foam insert between the jam chuck and the bowl makes the fit better and prevents friction marks and scarring by the face plate twisting against the bowl inner surface.

I turned on the lathe and the bowl turned perfectly on its original axis and there was not the least wobble. With this the foot can be finished and blended in with the base of the bowl without a trace of where the two curves met.

I purchased my center marker from Craft Supplies several years ago and have used with pleasure ever since. (www.woodturnerscatalogue.com)

I have learned over the years that if there is a tool you like it is best to purchase it now rather than wait. When you are ready the tool may no longer be available. This has happened to me enough times to make me sensitive to this point. When everyone has the tool, the sales collapse and the manufacturer turns his attention to something new. After all, this tool will last a lifetime.

Some of the very best tools are simple, easy to use and save you huge amounts of time and save you from frustration over the years. This, in my opinion, is one such tool.

{ 0 comments }

What Can I Do with That Wood?

Since the industrial revolution people have become removed from nature.  Things that were taken for granted in past centuries are not obvious to modern city dwellers.  The novice woodworker usually purchases dimensional lumber and turning blanks from commercial houses.  Often the species are limited to oak, maple, walnut, cherry and a few other species.

Being frugal by nature I have always gotten my wood in the rough.  Neighbors give me trees or logs or I find them left by the side of the road by utility companies.  Much of the wood I find comes from inside city limits where the wood is a liability for the home or business owner.

There are many non commercial species that one runs across.  Timber men want tall straight trees with no defects, crotches or knots. Many trees do not have such a growth pattern and don’t find their way into their inventories.  However, many are very beautiful or have unique characteristics.

I want to share my perspective as a turner and treen ware maker about some of the woods I have encountered.  This is not meant to be an exhaustive list but just my own personal experience.  I will start with the more common trees one encounters.

Oak is probably a very underrated species for wood turners.  I had a real bias against oak as rough turned bowls always seemed to check on me.  I would take large blanks out of the paper bags in which they had aged only to find to my dismay large ugly checks going all the way through the bowl making it useless.

A few years a large red oak had died across the street and when it was taken down by the professionals my neighbors said I ought to get some of it.  I told them I was not very interested as it always seemed to check on me.  Curiosity prompted me to walk across the street and actually examine the tree.  Lying on its side it was about five feet high.  It had lived 150 years by ring count.  The trunk had been sectioned into boles about 16 inches in length.

After inspecting one of these massive boles I determined that I could get some quarter sawn two inch thick pieces to make large platters with.  So, with permission, I ended cutting out a platter blank from the heart out to the top, bottom and each side of the bole.  However, it was so large that I was able to get four more from the remaining quarters.  Looking at the pieces that remained I could not make myself leave that beautiful wood in the snow.  Even though they represented eight sections of the bole they were still very heavy to lift into my van.

I had just learned to make natural edge bowls and decided to try that technique on these blanks.  You had the black bark, a layer of spalted sap wood and the red heart wood for nice contrast.  Now the technique for turning a natural edge bowl is to turn it to finished dimensions on the lathe.  I leave it attached to the face plate for a few days and then can begin sanding before I reverse chuck it to finish the foot.

The secret is to turn the bowl thin and make sure the bottom is s trifle thinner than the rim.  I partially make a parting cut to isolate as much of the wood  screwed on the face plate from the foot of the bowl to make sure that it allows the base and foot to dry along with the rim at the same speed.  This was a trick I learned from Fred Williamson, a fine bowl turner in the Crozet, Virginia area.

To my amazement six of the seven bowls I turned had absolutely no checking.  Now I was hooked on oak.  Here are some examples of the 150 year old red oak.

150 year old red oak bowl red oak bowl

On another occasion I was offered some 350 year old white oak.  It was part of a stand of virgin timber in a park in Baltimore, Maryland.  This tree was just outside the park but part of the stand of virgin timber.  Most of the trunk had already been cut up for firewood .  I took three pieces from very large limbs.  I remember not being very impressed at the time.  I split each piece and got six blanks to work with.  As soon as I put my gouge to the wood I realized I had something special.  The wood worked with unusual ease for oak and it completely drew me in.    I guess anything that can live for 350 years has something special going for it.  None of the six bowls checked and the woman who gave me the wood bought all five that I had completed.  I have one more that was not finished at the time and every time I look at it I wish I had gotten more.  The point of this is that oak is a lovely wood and when handled correctly gives wonderful results.  The big plus is that oak is everywhere. Here is a picture of the white oak bowl.  The light areas are due to spalting of the sap wood.

350 year old oak wood bowl

Cherry has to be one of my all time favorite woods for turning, treen ware and furniture. It is hard and does not carve easily like mahogany but in every other respect it is without a peer. It is tight grained, machines easily, takes a beautiful finish and is very durable. All woods tend to darken with age. Wood is carbon and if you have ever seen any 17th century antiques they are black. All wood reverts back to this color. Cherry wood has a dye in it which turns a beautiful deep red with continued exposure to light. Bowls that have been to many outdoor shows with me over the years are ever so much more pleasing to my eye because of that deep cherry red they have assumed and look quite different from their pale peers which have been newly turned. So, you don’t have to keep your cherry bowls out of the sunlight, it just makes them prettier. Other woods such as walnut tend to bleach in the sun but not cherry.

The reason I know about the dye in the cherry wood is that it stains my clothes like no other wood I work. My wife is constantly complaining about the stains it leaves on the towels. So you woodworker be careful what you do with your cherry dust.

cherry wood bowl

This is a cherry bvwl which has begun to take on that deep red color.

new wood cherry wood bowl

This is a more newly turned bowl. In time it will get as dark or darker than the cherry bowl above.

The crotch of a cherry tree is something in which timber men and fire place log splitters have no interest. Yet within these pieces are designs of spectacular beauty. Nature sews a crotch together with wood cells growing in all directions. Cells growing in one direction diffract the light differently than those growing in another direction. The result is light and dark ares which some have likened to a flame hence the name flame grained cherry. Below is a platter showing this feature. I have learned to cherish irregular grain. Flame grain is also spectacular in other woods such as walnut, mahogany, etc.

crotch wood cherry platter

Don’t overlook ornamental cherry trees. I was asked to make some things from a flowering cherry whose roots were growing into a swimming pool. It was not particularly large but I took some of the best pieces to the shop. Below is what came out of one. This wood took a beautiful finish and the yellow sap wood was most attractive to my eye.

flowering ornamental cherry wood bowls flowering ornamental cherry wood bowls

Maple is another wonderful wood. For those not familiar with the commercial timber nomenclature they use two terms. The first is rock maple. This generally means sugar maple and sometimes includes red maple. The second is swamp maple. By this they mean all other maples. The maple family is large. There is little question but what sugar or rock maple is a marvelous wood to work. It, too, is tight grained, but has a light color and machines well. It takes a lovely finish. Over time the maple turns a lovely yellowish gold color. My experience is that it takes about 20-30 years for this color to become fully apparent but it is very warm and pleasing to the eye. Stains cannot really do it justice. I prefer an oil stain without pigment and just allow the wood to age.

The maple is subject to genetic variation in how the wood cells grow. A wavy growth pattern can give us curly maple, tiger maple, fiddle back maple and birds eye maple. Norway maple, not native to America but imported as an ornamental tree, has some spectacular grain patterns as evidenced below. I have heard that the Stradivarius violins and cellos may have been made of Norway maple. If someone offers you Norway maple, it would be prudent to take them up on the offer.

Norway maple wood bowl
{ 4 comments }

Turning a Natural Edge Bowl-A Step by Step Guide

Some people learn by reading but others do not.  So I include lot of pictures with the text to help those others.

In the previous blog post I showed how to use a chain saw to prepare bowl blanks for mounting on the lathe.  In this post I show the steps for mounting the blank on the lathe and turning a bowl.  Specifically I am going to show how to make a natural edge bowl.  In natural edge bowls the outside or bark side of the blank will become the rim and the inner side ( heart wood) will become the base.

Natural rim bowls have visual appeal and certain advantages.  Since the outside of the log is curved the natural rim bowl will have an undulating edge going from high to low and back again.  It also will have bark on the outer part of the rim, provided it stays on, and a ring of lighter sap wood with darker heart wood in the center of the bowl.  This gives strong visual contrasts which many feel are attractive. Since the rim is already curving, any warping of the bowl rim as it dries will be undetectable.  Finally, the bowl can be turned and dried in a couple of days while a cut rim bowl may take months to dry and then has to be remounted to the lathe and turned again to hide the warping that inevitably occurs and achieve the final wall thickness.

For some, having the two higher sides of the rim in the same plane and the two lower sides of the rim also in the same plane are desirable.  It gives a feel of balance.  So I am going to assume this is the desire in this piece and will show how to mount this blank of cherry wood to achieve that end.


mounting blank to the lathe

Here I have brought the blank to the bed of the lathe.  My first job will be to determine the plane of the axis of rotation to give the effect mentioned above.  If I just mounted a faceplate to the flat side in this picture the high sides of the rim would not be in the same plane.  That also goes for the low sides of the rim.  Note that I have not added the faceplate yet but am going to turn this blank between centers.  To do this you need a large spur drive center in the head stock and you need to cut away the bark in the center so that the spur drive center can grip into the wood and not spin in the loose bark.  First I fit the drive center into the hole in the bark on the outside of the blank and then draw the tail center up to the other side to pin it securely.


pinning the blank between centers

Here I am pinning the tail stock into the heart wood side of the blank.  This is just a temporary fix and much adjusting will be needed.

It is not just a matter of putting the tail stock into the center of the circle that is the base of the blank.  In this job it would be nice to have four arms but I have learned to make do with two. The blanks may be heavy and awkward.


Now I have the tail center in the approximate location and am ready to clamp the tail stock to the lathe bed.


Here I have clamped the tail stock to the late bed and am ramming the tail stock into the blank to hold it securely.


Now I am ready to turn the blank by hand to make the final adjustments.


From visual inspection I have determined that the flat plane of the heart side of the blank made with the chain saw is not the plane I want.  Here you see that I have changed the angle quite a bit by lowering or raising the position of the tail stock.


Using my finger as a fixed reference point I slowly turn the blank between centers and see if I can  get the higher edges of the rim to lie in the same plane.  I make adjustments by either raising or lowering the position of the tail stock center on the blank at the heart wood side of the blank.  It is a trial and error exercise and it may take several adjustments to make the satisfactory change.  Here is where an extra set of hand would come in handy.

Once you are satisfied you have the high sides of the rim adjusted properly then you need to do the same process for the lower sides of the rim.  Once that is done you need to go back and check and make sure that both high and low sides are properly adjusted and make any slight changes that are needed.  Now you are ready to prepare the foot so that it is completely flat and in the plane that is perpendicular to the bed of the lathe.


As you can see from this photo and the one below that significant amounts of wood needed to be removed to true up the base allow the face plate to sit flat on it.


Here the truing up process is just about complete and the blank is ready for removing from between centers  for faceplate attachment.


Here I am using a wood carving gouge to remove the button of wood so that the face plate will sit flat on the base.


I like using a wooden mallet on the wood handled gouge.  This is one that I made which has a head made of dogwood.  It is a very hard wood but does not damage the wood handle of the gouge.


Now I am using a power drill to mount a six inch face plate to the heart side of the blank.  I really like the Souix angled drill shown here.  I find it more ergonomic for this use as well as for bowl sanding.  Everyone has their own preference for fasteners.  Frankly,  I just use sheet rock screws as they are cheap and quick.  I have tried thicker screws, stainless steel screws and just keep coming back to the sheetrock screws.  To compensate for the reduced holding power of these screws I just use more of them.  I prefer the square drive screws.  It is a good idea to measure the amount of the screw that will protrude from the faceplate.  This will tell you how much wood must remain waste wood on the bottom side of the bowl.  There are other ways of getting around this problem such as having the base go inside the circle of screw holes but for now we won’t go into that.


Here I am sharpening my 5/8 inch gouge with an Ellsworth jig.  I find the Ellsworth grind the most satisfactory one I have used.  You will find a description of David Ellsworth’s book in other blog issues I have written on this site.


Now the outside of the bowl has been finished.


Here I have started to turn out the inside of the blank.  When using a large blank, the banjo of the tool rest will not slide under the blank.  That means that you have to think ahead.  When doing the outside you need to slide the banjo all the way down to the head stock before screwing the face plate and bowl blank to the lathe.  When you want to do the inside of the bowl you need to remove the faceplate and bowl blank from the head stock and slide the banjo towards the tail stock and then reattach the face plate to the head stock.


Here I am sitting on the lathe bed as I hollow the inside.


Here is more of the same with the chips flying.  Turning wood which is wet allows for more aggressive cuts as the wood is softer (by 40%) when wet.


As I go deeper into the bowl I switch from the straight tool rest to a curved one so my  gouge is supported closer to the cut I am making.  It is safer and easier on the turner as you have greater mechanical advantage from a longer lever arm.  The tool rest is the fulcrum and the closer the fulcrum is to the cutting end of the gouge the greater the mechanical advantage.


Here I am measuring the depth by placing a straight rod, in this case my gouge, to the center bottom of the inside of the bowl.  It is good to sight down from one high rim to the other so that you get a true reading of the depth.


I place my thumb on the exact point of maximum depth and then take the gouge out of thebowl and using my thumb mark transfer the depth mark to the outside of the bowl.  Then I make a mark on the outside of the bowl to indicate how deep the bowl is on the inside.  As I  cut the bowl from the face plate this will keep me from making the parting cut too shallow or too deep.


Here I am making a cut to the final uniform thickness of the bowl wall from the inside.  The outside was already set before we began to turn the inside.  It is very important to have the bowl wall thickness uniform  in order to avoid checking of the wood when it dries.  Some will check no matter what you do but if the bowl wall is thin and uniform, very few will check has been my experience.


Every time I am too lazy to use the calipers, I regret it.  Here the calipers are set at a known width and slid down the bowl wall, with the lathe off.  When it begins to hang you know that more wood needs to be removed at that area.  Trimming cuts like this need to be done gently.  You cannot replace wood you have turned away.


Measuring of the bowl wall thickness is now complete.  Notice that in some areas of the rim the bark has come off.  When this happens I remove all the bark.  If it all stays on I leave it on.  Some people love the bark left on for the added contrast.  Others feel it is too impractical to use around food.  The bark edge is somewhat delicate and can chip off.  However, it is not too delicate or it would not have survived being cut to a narrow width with a gouge while spinning at 500 rpm.


In this picture I am removing some waste wood about the base and getting ready to use a parting tool.


Here I am using a thin parting tool to remove the bowl from some of the waste wood into which the face plate screws are lodged.


This is a trick I learned from a master bowl turner named Fred Williamson.  See the article on Fred williamson’s bowls elsewhere on the blog.    I will not complete this cut for several days.  However, I cut in deeply enough to leave only 1 to 2 inches of wood of the base of the bowl still connected with the waste wood with the screws attached.  How deep the cut depends on the size  of the bowl and the size of the faceplate being used.


What this step accomplishes is to separate the bowl base from most of the still wet wood in the waste attached to the faceplate.  I will leave the bowl just as you see it now.  In one to two days it is dry enough on the surface to begin sanding.  I use my Souix drill with sanding pads to do the rough sanding.  If you have ever tried to hold a large curved bowl in your lap to try to do this sanding you appreciate how nice it is to have the bowl still rigidly attached to the lathe so both hands can be used on the sander.  Working near the base, the lathe can even be spinning slowly to speed up the sanding process.  So the one or two inch plug at the bottom is enough to hold the bowl on the lathe but still most of the wet waste wood has been separated from the bowl so that the bowl base can dry evenly.

I am very grateful to Fred for sharing this technique with me.  If you have several faceplates then you can have multiple bowls drying for several days while you continue to turn more bowls from wet wood.

When you have completed the sanding of the bowl on the lathe then just cut through the plug that holds the base to the faceplate with a hand saw.  This is safer for me than parting off a large bowl with the lathe spinning.  If you use a saw, be careful how you angle the cut so that the saw teeth do not cut into the base of your bowl.  Sanding will finish the base so that it looks professionally done.


Here is the finished bowl.  All the bark has been removed and the rim has been trimmed with a pattern maker’s spokeshave and sanded smooth.

To finish my bowls I sand through grits 80, 120, 180 and 220.  Then I spray with dewaxed shellac  (I use Bullseye brand in an aerosol can available from Klingspor) to seal the grain.  Since the shellac has been dewaxed it is compatible with any other kind of finish including oil finishes. Sealing with shellac keeps the oil stain from soaking in the end grain and oozing out later to spoil the surface.  I sand all the shellac off starting with 220 grit and then progress with 320, 400 and 600 grit.  At this point I apply tung oil.  I get a food-safe grade and dilute it with mineral spirits so it will penetrate.  I use anywhere from one to four coats of tung oil waiting 24 hours between coats.  More coats give a deeper looking finish.  Then I like the bowl to dry for a month or more and then use the Beale buffing system I have described in earlier blog posts.  This starts with a coarse abrasive and ends with carnauba wax all applied with a buffing wheel.  This is a real labor saver and results in a low gloss sheen.  I am not in favor of shiny plastic appearing finishes.

Everything is easy when you know how.  With the ability to show text and graphics, it puts the skill of wooden bowl making within the reach of anyone who has the proper equipment.  Woodworkers have been generous to share their skills with me and I am pleased to be able to pass them on to you.


{ 4 comments }

Preparing Bowl Blanks with a Chainsaw

Some of us have a visual learning style. So in this section I would like to take you step by step using mostly pictures to view the process of going from a round log section to a finished bowl blank ready to mount on the lathe.

Hearing and eye protection

Hearing and eye protectors

It is always good to start with safety first. Here are my hearing protector ear muffs and safety glasses with side panels. It is too late to prevent a problem after it occurs.

Marking out the heart slab

Marking out the heart slab

Now I am marking out guide lines to remove the heart slab on this piece of the trunk of a mulberry log. Fine splits or checks are already present around the center of the heart and they will always cause a problem. However, the slab produced in removing the heart will produce very fine quarter sawn pieces when cut in half through the pith. This quarter sawn wood will not warp or cup when it dries and has many uses such as for platters or cutting boards.

Marking outside of log for sawing

Marking outside of log for sawing

Now I extend these lines from the end grain to the outside of the log. This is to be able to see the mark when cutting with the chain saw.

Placing wood to be cut on waste slabs

Placing wood to be cut on waste slabs

Please note carefully. I am placing the log to be cut on two supporting waste longs. This is so important. There is space between the bottom of the log  to be cut and the ground so that when the saw cuts through the bottom of the log it will not get into the dirt. Just the smallest amount of dirt will dull the chain and cause excessive wear. I had to learn this the hard way buy trial and error for years. I would like to offer you this short cut on that learning curve.

First cut

First cut

Here I begin to cut the log. I have read that cutting parallel to the length of the trunk produces lost of stringy shavings and these can bind up the saw. This author said it was better to cut the end grain by standing the log on end. This will produce a fine sawdust. I have tried it both ways. Sawing on end grain is slower and harder on the saw. I prefer to cut as pictured above. It does produce lots of stringy shavings but I have not found that a problem with my saw and it is ever so much easier and faster to cut this way.

Second cut

Now I am making the second cut parallel to the first. This will remove the center of the heart. Notice that I did not complete the first cut. This allows me to make the second cut with the log still intact. It is much easier this way.

Finishing the second cut

Finishing the second cut

Now I have completed my second cut and will go back and finish the first cut.

Finishing the first cut

Finishing the first cut

Here I am finishing my first cut. I have propped up the log to be cut on the waste log underneath.

Completion of both cuts

Completion of both cuts

Now the first cut is complete. This gives two halves for bowl blanks and an center slab of quarter sawn wood.

Template for layout of bowl blank

Template for layout of bowl blank

At this point I am preparing to lay out a blank to mount on the lathe. For this I  have made a set of templates of varying diameters with a hole in the exact center of the template. Then I use either a felt tip marking pen if it is a light wood such as this mulberry or chalk if it is a dark wood like walnut.

Checking (crack) in end of blank

Checking (crack) in end of blank

Note that there is a small check or crack on the heart area of the end of the log. It will be necessary to see just how deep this goes and to design your bowl so that this checked area is sawn or turned away if possible. If not, then it is better to discard this blank and use the that portion of this blank which is not checked for other purposes.

Tracing the circle

Tracing the circle

Hold the template steady with one hand and trace around the edge with the pen and mark the center as this will be important when you mount the blank on a faceplate. An off center mounting of the face plate will waste wood and give you a smaller than intended bowl.

Completed blank pattern

Completed blank pattern

Here is the completed outline to guide the rough cutting prior to mounting on the lathe and the center is clearly marked. This will allow you to center the faceplate correctly. Notice how I have positioned the template to avoid the checked area on the left side of the log.

Marking larger blank

Marking larger blank

Now I am marking the other half of the log we prepared. Note that I am using a larger template on the same sized log as the first. This side of the trunk round had no check in it so I was free to use the entire length in a bowl. So I used a 14 inch template in place of the 10 inch template used on the previous half. This means that the ends of the blank will be 14 inches but the sides will be considerably less. In a finished bowl the sides of this bowl will be much lower than the ends and result in a bowl which looks oblong. At trade shows customers are always asking how I could turn an oblong bowl on a lathe. Done properly it is eye catching.

Completed lay out of larger bowl

Completed lay out of larger bowl

Here is the completed lay out.

Trimming the blank with the chainsaw

Trimming the blank with the chainsaw

Now I am trimming the blank with the chain saw. It can be done with a large band saw but because the bottom is not flat, I find it safer to do with the chain saw.

Trimming  corners

Trimming corners

Here I am trimming the corners.

Completed bowl blank ready to mount to lathe faceplate

Completed bowl blank ready to mount to lathe faceplate

Here is the trimmed blank ready for mounting on a face plate or mounting between centers to get the proper level of the ends and sides of the bowl so that a new face can be turned for mounting the face plate.

Every bolt of wood cut from a trunk or large limb should yield two bowl blanks and a heart slab with two halves which are quarter sawn. It is easy to calculate how many and what sized bowl blanks you can get from a given length and girth of a tree trunk or large limb.

It always makes me feel good to know that I have saved wood from the trash or fireplace and turned it into something useful or beautiful or, hopefully, both. A well turned object extends the useful life of this tree for many more decades. Further, if if came from someone who lived with the tree, they are thrilled to get a finished product to remind them of the tree they lost.

Special thanks goes to Todd Smith, my number one (and only) son of toddsmithphotography.com for the photographs and the design of this website.

{ 9 comments }

Fredrick Williamson, Virginia Bowl Turner

Once in a while you have the good fortune to meet someone who is truly outstanding in what they do. I had known about Fred Williamson for many years. I did not include pictures in this post as Fred’s site is filled with them and better you visit it directly.

He had been commissioned by my brother-in-law about 10 years ago to make something from a maple burl he had cut from a tree on his property near Charlottesville. Fred had fashioned a hollow vessel that was quite attractive. I was told that he lived not too far away in a hollow on the east side of the Blue Ridge Mountains about 20 minutes away from Crozet, Virginia.

About three years ago I applied to show my work in the Crozet Arts and Crafts Festival in Crozet. Fred Williamson, who had been exhibiting in that show for many years was there and briefly came by my booth. Since I tend to work these shows by myself, I only took a moment away from my booth to look at his work. They were open formed, thin, natural edged bowls made of large bolts of wood.

The next year I did the show in Crozet I had some help so I looked at his work more carefully. By this time I had started to do natural edged bowls myself and was really ready to see what I needed to learn. I had been troubled with end grain tear out and no matter how much I sanded, the oil finish always revealed a darker unsightly area where the fiber damage was.

Two women came by my booth at that show and one of them seemed to be really interested in one of my new natural edge bowls. Her friend tugged at her sleeve and motioned that she needed to check out another vendor. So they headed towards Fred’s booth. By this time, Fred’s work really had my attention. That evening I attended a reception for the artists sponsored by the show. I approached Fred and asked him if I might visit his shop to address the problem I was having. Fred said that he does not teach but he would be willing to help me with the issue.

One January day in 2010 we met at his shop. What I learned exceeded all my expectations. Fred had honed his techniques through many years of constant practice. Yet what I learned transcended technique. Fred was able to see ideal curves in his mind’s eye. He used his technical skill to allow those curves to flow into the wooden vessel.

Every time my clumsy technique would destroy an ideal curve he had created, he would recreate the curve. If I damaged it badly he would create another slightly different but no less ideal curve. He simply could see the ideal curve and made the wood conform to it.

Now this might not sound so impressive to you but any great turner or any kind of artist will say over and over that design is the most crucial part of any artistic endeavor. Technique is important to be able to express the ideal form, yet it does not create the ideal form. Attractive patterns and colors enhance the ideal form but if they are applied to a poor form then the result is poor.

This ideal form is something that cannot be taught by watching someone else work. Technique may be great and material truly outstanding but the inadequate form will make the piece of little value and it will not endure.

Ideal form is a transcendental or absolute value. It comes from nature itself and can be cognized by human awareness. Some come by this naturally by birth. You have often heard it said that he or she “was a natural artist just born with the gift.” For others, it can be acquired by techniques which put you in contact with the laws of nature on a regular basis until you see them as Fred sees them. Without birth or technique, accessing this knowledge will be rather fruitless.

Fred was very patient in addressing my poor techniques, and now all I have to do is to practice over and over until I get them down. This process can take years. Yet, what I learned from Fred was a lesson far more valuable. I learned to look for the ideal curve even as I eyed the rough bolt of wood. I learned to lay out the blank for rough sawing, keeping the ideal curve contained within well in mind. I learned to rough out the blank so that my ideal curve could emerge fully.

So, if you are a serious bowl collector you should give Fred Williamson’s site (www.fredwilliamson.com) a thorough visit. If you are not a serious bowl collector, perhaps you should consider becoming one. I can assure you that looking at those ideal curves skillfully created out of beautiful woods will bring you pleasure and make you feel uplifted every time your eye falls on one of his creations.

thin natural edge bowl top

I just had to include a couple of pictures of the finished product of that lesson.

thin natural edge bowl top

If you are a bowl turner like myself you will find a wealth of technical information that Fred has so generously shared in his Methods of Work section. Either as a collector or as a craftsman, you owe it to yourself to visit his site and become acquainted with the art and craft of Fred Williamson, Virginia Bowl Turner.

{ 0 comments }

Making Wooden Spoons

Last year I got a letter from a wooden spoon collector named Norman D. Stevens of Storrs, Connecticut. It seems that he became interested in collecting spoons by American woodcarvers. One of his internet searches pulled up my name and he sent a letter inviting me to contribute to his growing collection which I did.

The more I thought about this, the more I appreciated what Norman is doing. He is documenting the state of wooden spoon making throughout the world in the early 21st century. Norman has complied a directory of perhaps as many spoon makers he has identified, and  is maintaining hard copy files with background information and correspondence with many of those artisans.

More importantly, he is creating a catalog describing each contributor to his collection and his or her spoon. A number of his spoons are on display through May 23, 2010 in an exhibit at the American Association of Woodturners in Saint Paul, MN.

Norman Stevens Spoon Collection Display

There will also be a special display of many of his spoons, with presentations by Norman, at the AAW Symposium in Hartford, CT from June 19-20, 2010. That exhibit is open to the public without charge. Further information can be found at: http://www.woodturner.org/sym/sym2010/. AAW will be issuing and selling a catalog for the exhibit at the Symposium that will contain color images of about 100 of the spoons. There is also an exhibit scheduled for the Gallery-on-the-Plaza of the Homer Babbidge Library of the University of Connecticut. If you are interested in his project his e-mail is: normanstevens@mac.com.

What a nice thing to do! Spoon makers are not exactly in the spotlight of American woodworking so to pay tribute to the many fine craftsmen who devote their energies to spoon making is like a breath of fresh air to me.

Spoons Got Me Started in Woodworking

It turns out that wooden spoons were my first venture into woodworking as an adult. I had cut down a maple in my back yard to make some light for a vegetable and rose garden. The wood was so pretty and white that I couldn’t bear to split it all for firewood so I saved a log or two.

By the time I got around to a project with the maple it had spalted nicely. My first impression was that the wood was ruined but the more I worked with it the more I came to appreciate the spalting. As I learned more, I realized that I had cut a curly maple log that had spalted and then I wished that I had saved the whole tree.

There are as many ways to make a wooden spoon as there are wooden spoon makers. I thought I would just share some of my thoughts about the craft. A test I once took indicated that I was a pragmatic idealist. That sounds like a bit of an oxymoron but it really does describe two opposite aspects of my character.

Spoons For Looking And Spoons For Cooking

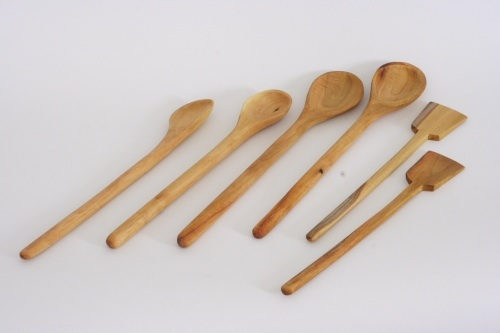
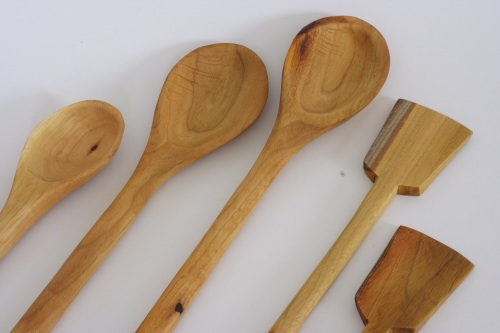
I do appreciate the intricate work of spoons with all of the delicate cut out work, but the spoons I wanted to make were to be used in cooking. Every fine cook knows that nothing beats a good wooden spoon. So my spoons had to be practical and built to last.

My first ones were a bit clunky but seemed to please the intended users. On the other hand, I wanted my spoons to reflect the beauty of nature stored in the wood and that this be set off by some refinement of the design.

One thing I looked for in the design was a sturdy handle. The flimsy ones from the box stores are too easy to break. I wanted ones that would hold up to the hardest tasks. I got an e-mail from one of my customers this year. She said the spoon I made for her was the only one that was up to stirring her fruit cake batter and it was her favorite spoon. That appealed to the pragmatism in my nature.

Taking Advantage of Wood Grain

As I learned more about woodworking I realized that making the handle parallel to the direction of the grain made for a handle which was stronger and not quite as much mass was needed to keep the handle sturdy.

With more experience I learned that the grain does not always run straight in every piece of wood and that it was alright to have the handle curve this way or that following the grain of that particular log. In the colonial days the wood for spoons was rived with a froe (a metal blade which was pounded into the end grain). This caused the wood to split right along the path of the grain and all handles produced in this manner had handles which followed the grain.

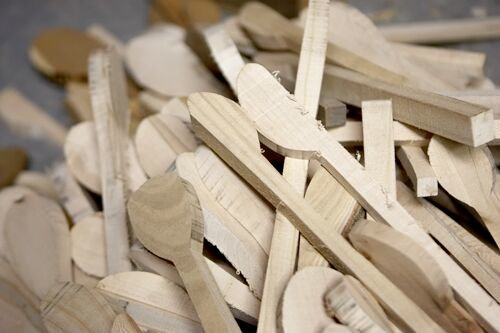
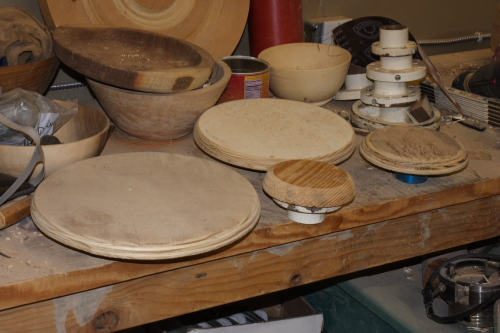
Some still rive the wood for spoons and this is a fine way to make them. Yet I need to do production work as I sell many spoons at craft shows. They are one of the most consistent sellers. I have probably made more than a thousand spoons and so now I cut my blanks from wood which has been sawn into planks with the band saw. The band saw is such a useful tool as it allows you to make planks out of any log or branch that comes your way.

Below is a picture of a few of my spoon blanks.

spoon blanks

Another thing I learned is that cooks like spoons that are not completely symmetrical and they like odd shapes. It may help them locate their favorite from their collection and the odd shape or curved handle may be just what is needed for a particular job.

So now I vary my design to suit the wood grain and my whim and just draw the design freehand on the plank. This way it is easy to follow the grain in the handle. I then go back to the band saw and cut the outline drawn on the plank.

Gouging the Spoon’s Bowl

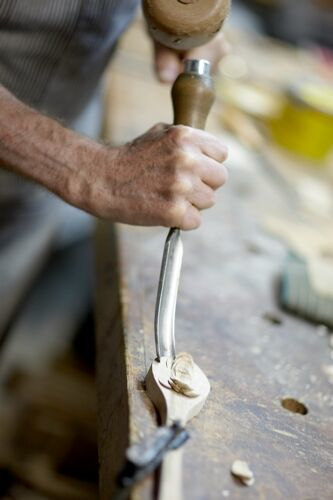
The next challenge is to hollow out the bowl of the spoon. Again, the ways to accomplish this task are numerous. I settled on using a spoon gouge with a curvature that suits the maker. Too shallow and the edges of the gouge will dig into the sides of the spoon bowl… Too steep and you will get deep grooves in the wood and not a smooth flowing curve of the spoon bowl.

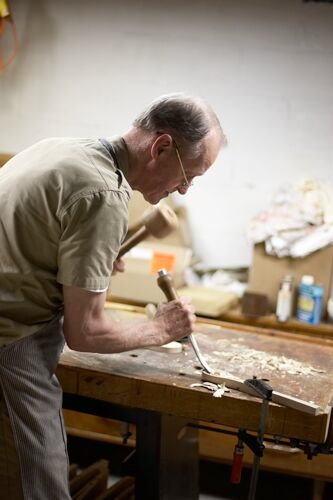
The width of the gouge is also a matter of personal choice but I use one wide enough to remove plenty of waste wood with a single pass. I have had a number of bent gouges but they seem to have a propensity to wander off when I do demonstrations and the only one left is one that never leaves my shop. It is a firmer gouge, meaning that it is thicker and will stand up to repeated heavy use. It is the one in use in the picture below.

wooden mallet

Now unless you are a whole lot stronger than I, you will not be able to push this gouge through the wood for very long using just the muscles of your hands and arms. This is especially true of hard woods such as fruit woods like cherry and apple.

To remove large amounts of wood quickly I use a wood carver’s mallet. The one shown above I made of a dogwood head (very hard) and a hickory handle. Beech also works well.

Notice that the handle of the gouge has a metal ferrule on the end which keeps the wood of the gouge handle from splintering from repeated blows. With these tools I am able to remove large amounts of waste wood quickly. I keep the spoon blank secured to the work bench with a simple clamp.

I start at one end of the bowl and remove some wood. However, if I go too deeply the wood will tend to split and ruin the blank. So I go as far as I dare and then remove stock from the opposite side. I always work in the direction of the grain. By going back and forth from one end to the other I can remove large amounts of waste in a short period of time.

scooping the spoon bowl hollowing spoon

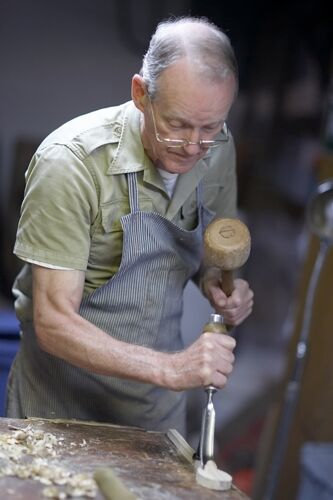
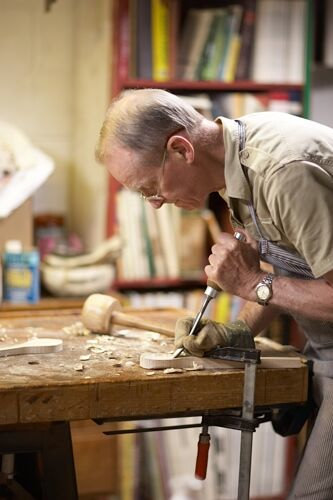
By angling the cutting edge of the gouge one way or the other you can begin to shape the walls of the spoon bowl. The straight cuts work best for roughing out and for the bottom of the spoon. Below I am cocking the gouge to one side to make the near wall of the spoon bowl.

Here you need to exercise care not to take such big cuts as will cause splitting because you are now working on a thin rim of the spoon with less margin for error. You will find that some species of wood will split far more easily than others.

chisel technique

You can only get so much control of the cutting edge of the gouge when you are pounding on it with a heavy carver’s mallet. So for finer cuts I just use muscle power without the mallet striking the gouge as seen in the picture below. Notice I use a glove on the hand that guides the cutting edge.

Considerable force is needed to make even these lighter cuts and if the hand slips it may hit sharp corners of the band sawn edge of the blank and cause cuts. Using a glove in the hand that does not grip the gouge handle cuts down on the need for band aids and loud exclamations.

hollowing by hand

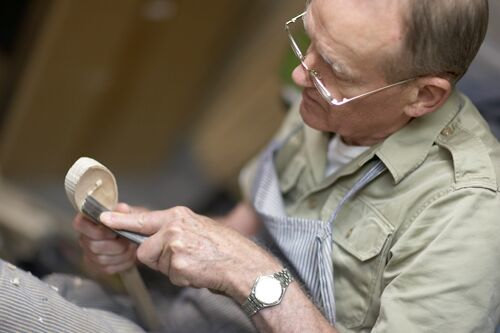
For the finest cuts I remove the blank from the clamp on the bench, sit comfortably and use the gouge free-hand as you see me doing below. This gives maximum control and allows clean up of any rough areas left from previous steps.

out of the vise finishing spoon bowl

In my earlier spoon making days I used to carve the outside of the bowl of the spoon and the handle all by hand. I used a combination of gouges, draw knives and small pattern maker spoke shaves to remove the waste. However this is a slow process.

Now I use a large belt sander with an aggressive planer belt from Klingspor. With a bit of practice you can smooth the contours and remove all the bandsaw blade saw marks. You can even round out the handle.

Sanding and Oiling the Spoons

What remains is to hand sand the spoon. I do not go above 220 grit as these spoons are for cooking and finer finishes are not important. I oil my spoons with sesame oil. I used to use mineral oil but since this is a petroleum based product and not renewable, I feel more comfortable using a vegetable oil.

I choose sesame oil as it has the longest shelf life of all the non-drying oils and does not become rancid easily. This is due to unique antioxidants found in sesame oil and not in other vegetable oils.

I don’t recommend olive oil as it spoils very quickly and you get a tacky residue building up on the utensil. A food safe drying oil such as tung oil can also be used.

Care of the finished product is very easy. Just wash in soapy water and let it air dry. Over the course of time the surface may become whitened due to fragmentation of the fibers with repeated use and washings. Just apply another coat of sesame oil and the finish is restored.

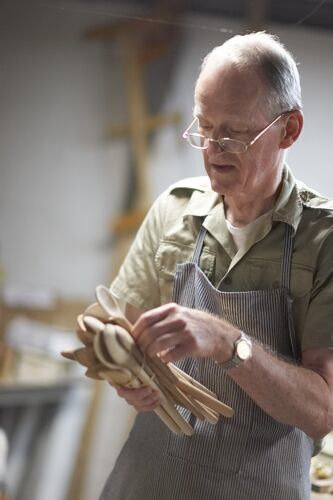
For heavily used spoons a light sanding before reapplication of the oil is all that is needed. A well cared for spoon can last for generations. Below is a picture of spoons ready for oiling.

finished spoons

Other Methods of Wooden Spoonmaking

I would just like to say a few words about other methods of making spoons. If you only want to make one or a few, then you may enjoy carving them completely by hand. This allows for great individual expression.

There are even special tools for hollowing out the bowl such as curved bladed carving knives or special spoke shave like tools with a curved blade. Just bear in mind that the curve of the spoke shave tool will limit the radius of the bowl of the spoon.

More recently I have used special carbide cutting burrs with a flexible shaft tool. There are burrs which are suited to hollowing the bowl of the spoon. There is a bit of a learning curve to this. It requires a firm hand and practice to know how aggressively to make the cuts or you will find that the bit wanders and wipes out the rim of the spoon you are trying to make.

It is easier with one of these tools to make a deeper bowl in a spoon than you can with spoon bent gouges. After using the burrs I clean up the tool marks with the hand held spoon bent gouge using light finishing cuts. So for certain shapes I have actually come to prefer this method of hollowing.

Some spoon makers turn a blank on the lathe. This gives a very symmetrical round handle and outside of the bowl of the spoon. Then they may use a saw to remove waste from the spoon bowl and use some hollowing process to carve the inside of the spoon bowl.

Some even mount this on the lathe and turn it out. Be advised that what you have is a spinning propeller and take care to keep fingers away from the spinning handle which you cannot completely see.

So, I have not tried to provide a comprehensive treatise on spoon carving but rather to share with you what works for me with an eye towards making useful and practical cooking spoons in sufficient quantity to meet the needs of my crafting.

I find that it is a good means of using up odds and ends of wood from the shop. After more demanding tasks I find it very relaxing to work up a few spoons and allow for my creativity to express itself in this simple way.

Wooden spoons make wonderful gifts. People especially love when the wood is from a tree or a limb that they gave you. With a bandsaw, any limb wood can produce good spoon blanks. It provides them with a connection to the nature that they had known and come to love. The tree may be gone but the memory of it survives in the spoon and that can be passed down from generation to generation.

{ 71 comments }